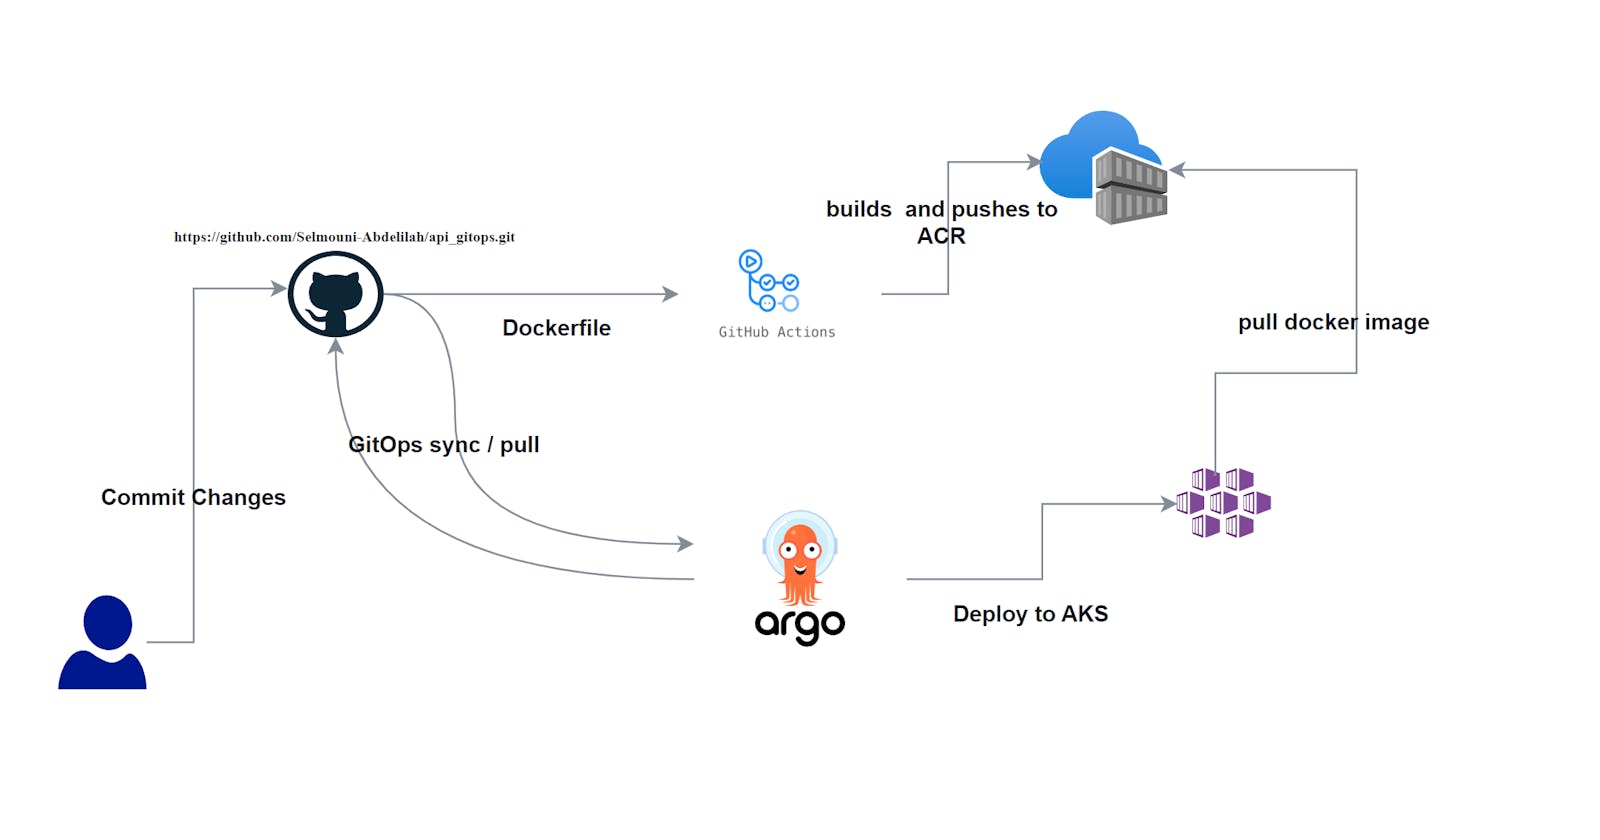


In this guide, we'll walk through a simple example of deploying a .NET API to an Azure Kubernetes Service (AKS) using ArgoCD for GitOps automation and GitHub Actions for CI/CD. We'll containerize the .NET API using Docker, set up the necessary Azure resources, configure GitHub workflows, and use ArgoCD to manage the deployment to AKS.

Overview
We'll start by containerizing a simple .NET API, setting up Azure resources such as a container registry and AKS cluster, configuring GitHub workflows to build and push Docker images, and finally using ArgoCD to manage the deployment to AKS.
Step 1: Clone the Repository
Clone the repository containing the sample .NET API code from GitHub:
git clone https://github.com/Selmouni-Abdelilah/api_gitops.git
Step 2: Dockerize the .NET API
Navigate to the root directory of the cloned repository and create a Dockerfile to containerize the .NET API.
# Multi-stage Dockerfile for building and running a .NET application
FROM mcr.microsoft.com/dotnet/sdk:8.0 AS build
ARG BUILD_CONFIGURATION=Release
WORKDIR /src
COPY . .
RUN dotnet restore "./api_gitops/api_gitops.csproj"
RUN dotnet publish "./api_gitops/api_gitops.csproj" -c $BUILD_CONFIGURATION -o /app --no-restore

FROM mcr.microsoft.com/dotnet/sdk:8.0
WORKDIR /app
COPY --from=build /app ./
EXPOSE 8080
ENTRYPOINT ["dotnet", "api_gitops.dll"]
Step 3: Create Azure Resources

Set up Azure resources such as a resource group, container registry, and AKS cluster using the Azure CLI.
3.1. Create a Resource Group
az group create --name gitopsapi-rg --location eastus
3.2. Create a Container Registry
az acr create --resource-group gitopsapi-rg --name gitopscontainerregistry --sku Basic
3.3. Create an AKS Cluster
az aks create --resource-group gitopsapi-rg --name gitops-cluster --node-count 1 --generate-ssh-keys
3.4. Grant AKS Access to ACR
az aks update -n gitops-cluster -g gitopsapi-rg --attach-acr gitopscontainer
Step 4: Configure GitHub Workflow
Create GitHub Actions workflow to automate the build and push process of Docker images to the Azure Container Registry.
4.1. Create Azure Credentials
In the GitHub workflow, create Azure credentials to authenticate to the Azure CLI. Follow the instructions to create a service principal with the Contributor role scoped to the resource group for your container registry.
First, get the resource ID of your resource group. Substitute the name of your group in the following az group show command:
groupId=$(az group show --name <resource-group-name> --query id --output tsv)
Use az ad sp create-for-rbac to create the service principal:
az ad sp create-for-rbac --scope $groupId --role Contributor --json-auth
Output is similar to:

Save the JSON output because it is used in a later step. Also, take note of the clientId, which you need to update the service principal in the next section.
4.2. Update Registry Authentication
Update the Azure service principal credentials to allow push and pull access to your container registry. This step enables GitHub Actions to use the service principal to authenticate with the container registry and push and pull a Docker image.
Get the resource ID of your container registry. Substitute the name of your registry in the following az acr show command:
registryId=$(az acr show --name <registry-name> --resource-group <resource-group-name> --query id --output tsv)
Use az role assignment create to assign the AcrPush role, which gives push and pull access to the registry. Substitute the client ID of your service principal:
az role assignment create --assignee <ClientId> --scope $registryId --role AcrPush
4.3. Save Credentials to GitHub Repo
In your GitHub repository settings, navigate to Settings > Secrets > Actions

Add the following secrets:
AZURE_CREDENTIALS: The entire JSON output from the service principal creation step.REGISTRY_LOGIN_SERVER: The login server name of your registry (all lowercase).REGISTRY_USERNAME: TheclientIdfrom the JSON output of the service principal creation.REGISTRY_PASSWORD: TheclientSecretfrom the JSON output of the service principal creation.
4.4. Create Workflow File
Create a GitHub Actions workflow file named main.yml with the following content:
on:
  push:
    branches: [ "master" ]
  pull_request:
    branches: [ "master" ]

jobs:
    build-and-push:
        runs-on: ubuntu-latest
        steps:
        - name: 'Checkout GitHub Action'
          uses: actions/checkout@main

        - name: 'Login via Azure CLI'
          uses: azure/login@v1
          with:
            creds: ${{ secrets.AZURE_CREDENTIALS }}

        - name: 'Build and push image'
          uses: azure/docker-login@v1
          with:
            login-server: ${{ secrets.REGISTRY_LOGIN_SERVER }}
            username: ${{ secrets.REGISTRY_USERNAME }}
            password: ${{ secrets.REGISTRY_PASSWORD }}
        - run: |
            docker build . -t ${{ secrets.REGISTRY_LOGIN_SERVER }}/apigitops:latest
            docker push ${{ secrets.REGISTRY_LOGIN_SERVER }}/apigitops:latest
This workflow triggers on pushes to the master branch, builds the Docker image, and pushes it to the Azure Container Registry.
Navigate to your container registry and check the docker image with the latest tag

Step 5: Create Kubernetes Manifests
We need to create deployment and service manifests for our API to deploy to AKS.
5.1. Deployment Manifest (deployment.yaml)
yamlCopy codeapiVersion: apps/v1
kind: Deployment
metadata:
  labels:
    app: api-app
  name: api-app
spec:
  replicas: 2
  selector:
    matchLabels:
      app: api-app
  template:
    metadata:
      labels:
        app: api-app
    spec:
      containers:
        - name: api-app
          image: gitopscontainerregistry.azurecr.io/apigitops:latest
          ports:
            - containerPort: 8080
          resources:
            limits:
              memory: "512Mi"
              cpu: "256m"
            requests:
              memory: "256Mi"
              cpu: "128m"
This Kubernetes manifest defines a scalable deployment with two replicas, each running the Docker image `gitopscontainerregistry.azurecr.io/apigitop..`. It exposes port 8080 and specifies resource limits for memory and CPU.
5.2. Service Manifest (service.yaml)
yamlCopy codeapiVersion: v1
kind: Service
metadata:
  name: api-app-svc
spec:
  selector:
    app: api-app
  type: LoadBalancer
  ports:
    - protocol: TCP
      port: 80
      targetPort: 8080
This Kubernetes manifest defines a service of type LoadBalancer to expose the application externally on port 80. It routes traffic to the pods based on the specified selector.
Push everything to your GitHub repo.
Step 6: Set Up ArgoCD
Argo CD is a declarative, GitOps continuous delivery tool for Kubernetes.It automates the deployment of the desired application states in the specified target environments. Application deployments can track updates to branches, tags, or pinned to a specific version of manifests at a Git commit

6.1. Connect to AKS Cluster
az aks get-credentials --name gitops-cluster --resource-group gitopsapi-rg
6.2. Install ArgoCD
kubectl create namespace argocd
kubectl apply -n argocd -f https://raw.githubusercontent.com/argoproj/argo-cd/stable/manifests/install.yaml
6.3. Access ArgoCD Server
Use Kubernetes port-forwarding to access the ArgoCD server:
kubectl port-forward svc/argocd-server -n argocd 8080:443
Retrieve the default ArgoCD password:
kubectl -n argocd get secret argocd-initial-admin-secret -o jsonpath="{.data.password}" | base64 -d; echo
Then, open your web browser and navigate to http://localhost:8080.
You'll be prompted to sign in to ArgoCD. Use the admin username and the password retrieved from the previous command.
Note: Since there is no certificate configured, your browser may display a warning indicating that the connection is not secure. For the purpose of this demonstration, we'll ignore this warning. However, in a production environment, it's crucial to configure SSL/TLS certificates to ensure secure communication.

Step 7: Deploy Application with ArgoCD
Create an ArgoCD Application manifest named application.yaml with the following content:
apiVersion: argoproj.io/v1alpha1
kind: Application
metadata:
  name: argocd-app
  namespace: argocd
spec:
  project: default
  sources:
    - repoURL: https://github.com/Selmouni-Abdelilah/api_gitops.git
      targetRevision: HEAD
      path: ./
  destination:
    server: https://kubernetes.default.svc
    namespace: gitops
  syncPolicy:
    syncOptions:
    - CreateNamespace=true
    automated:
      selfHeal: true
      prune: true
When this ArgoCD Application definition is applied to an ArgoCD instance, it orchestrates the deployment and synchronization of the specified application from the designated Git repository to the specified Kubernetes cluster and namespace.
To install the Application to Argocd, run the following command from the root folder.
kubectl apply -f application.yaml
Access your ArgoCD server at localhost:8080. After a brief period, ArgoCD will automatically synchronize with the changes and initiate the deployment process. You should observe a similar representation on your ArgoCD dashboard as depicted in the following image.

Step 8: Verify deployment
Now that we've deployed our .NET API to AKS, let's verify that it's up and running.
Navigate to Azure Portal:
Open the Azure Portal and navigate to the AKS cluster named
gitops-cluster.Check Services and Ingresses:
In the AKS cluster dashboard, navigate to the Services and Ingresses section.
Retrieve External IP:
Locate the service named
api-app-svcand copy its external IP address.
Access API in Browser:
Open your web browser and paste the external IP address copied in the previous step. Hit enter to access the URL.

Verify API Response:
You should see the response from your .NET API similar to the screenshot provided earlier.
Conclusion
By following these simple steps, you can deploy a .NET API to AKS using ArgoCD and GitHub Actions. This example demonstrates the basic workflow for automating the deployment process and managing Kubernetes applications with GitOps practices. Feel free to customize and expand upon this example to suit your specific requirements.
References
Some useful links:
https://argo-cd.readthedocs.io/en/stable/getting_started/
Thanks for reading :)