Create and Deploy a .NET Web API for CRUD operations to Azure using GitHub Actions #Part 1


Introduction:
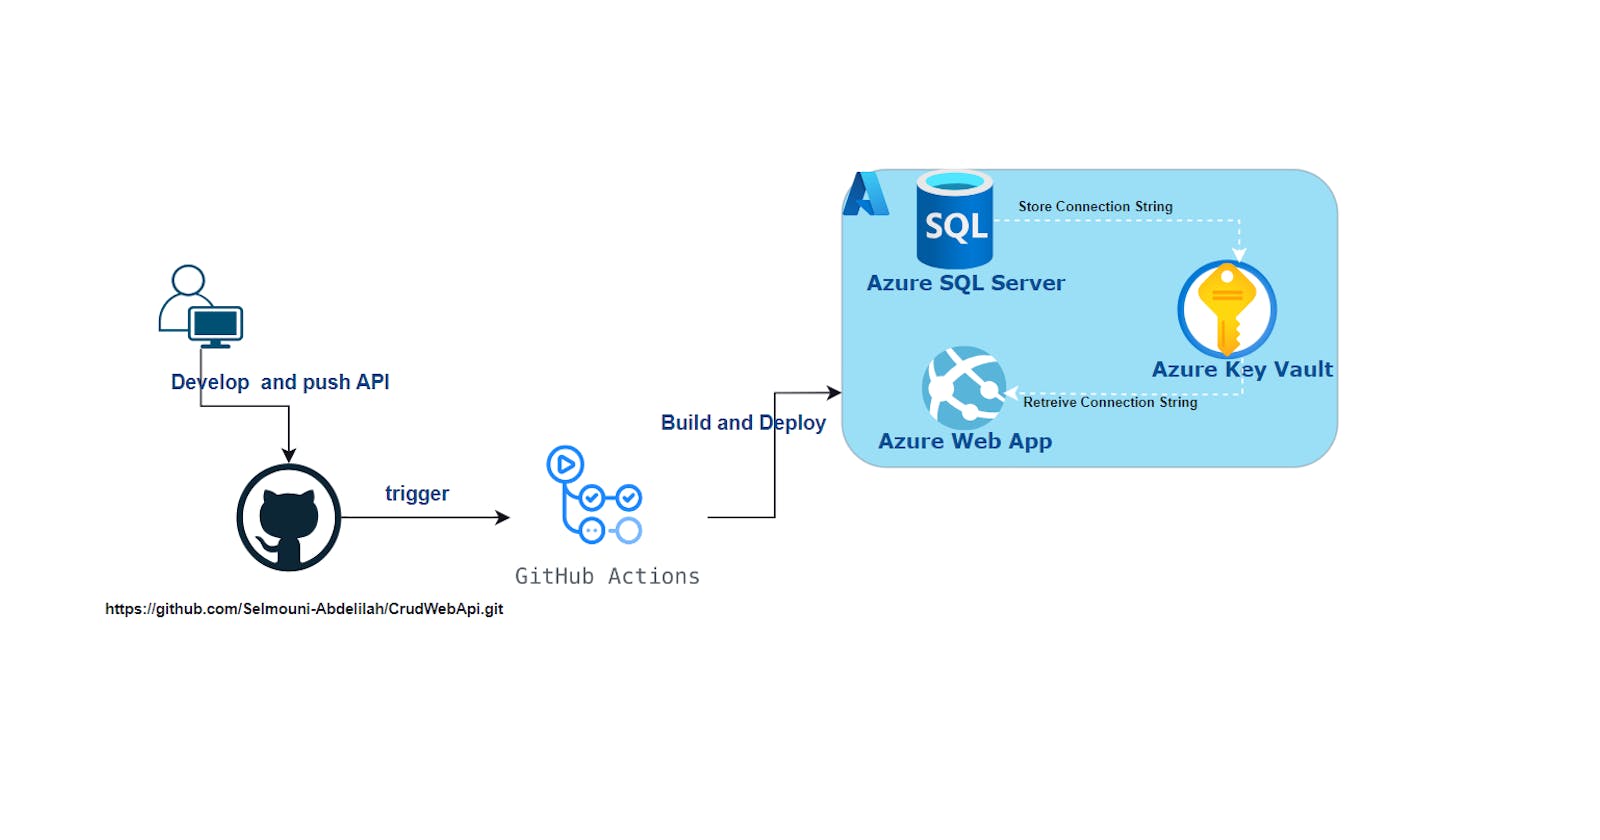
Building robust APIs is a fundamental aspect of modern software development. In this two-part series, we'll go through the process of creating a .NET API with CRUD (Create, Read, Update, Delete) operations, and then deploying it to Azure Web App using GitHub Actions.
In this blog we'll be Creating the .NET API Locally
Check the second part here : part2
First we will create an Azure SQL Database to use it when testing our API
Create an Azure SQL Database
Login to the Azure CLI by running az login.
Create a Resource Group named crud-api-rg to house your resources with az group command.
az group create --name crud-api-rg --location eastus
Create a SQL server in your resource group name apisqlserver by running
az sql server create \
--name apisqlserver \
--resource-group crud-api-rg \
--location eastus \
--admin-user "<Your-Admin-Username>" \
--admin-password "<Your-Password>"
Configure a firewall for your server by running:
az sql server firewall-rule create \
--resource-group crud-api-rg \
--server apisqlserver  \
--name AllowAllIps \
--start-ip-address 0.0.0.0 \
--end-ip-address 0.0.0.0
Create a heros database on your newly created SQL server.
az sql db create \
--resource-group crud-api-rg \
--server apisqlserver  \
--name heros \
To add a table to your heros database, we will need to login to the Azure portal and find your crud-api-rg Resource Group, and click on your heros SQL database.
Go to the Query Editor and attempt to enter your SQL database using the username and password from when you created the SQL server. It should fail as your local IP address has not been given access to the server, per your firewall rule.Click on Add Client IP.
Now, enter the SQL database using your username and password from the Query Editor.

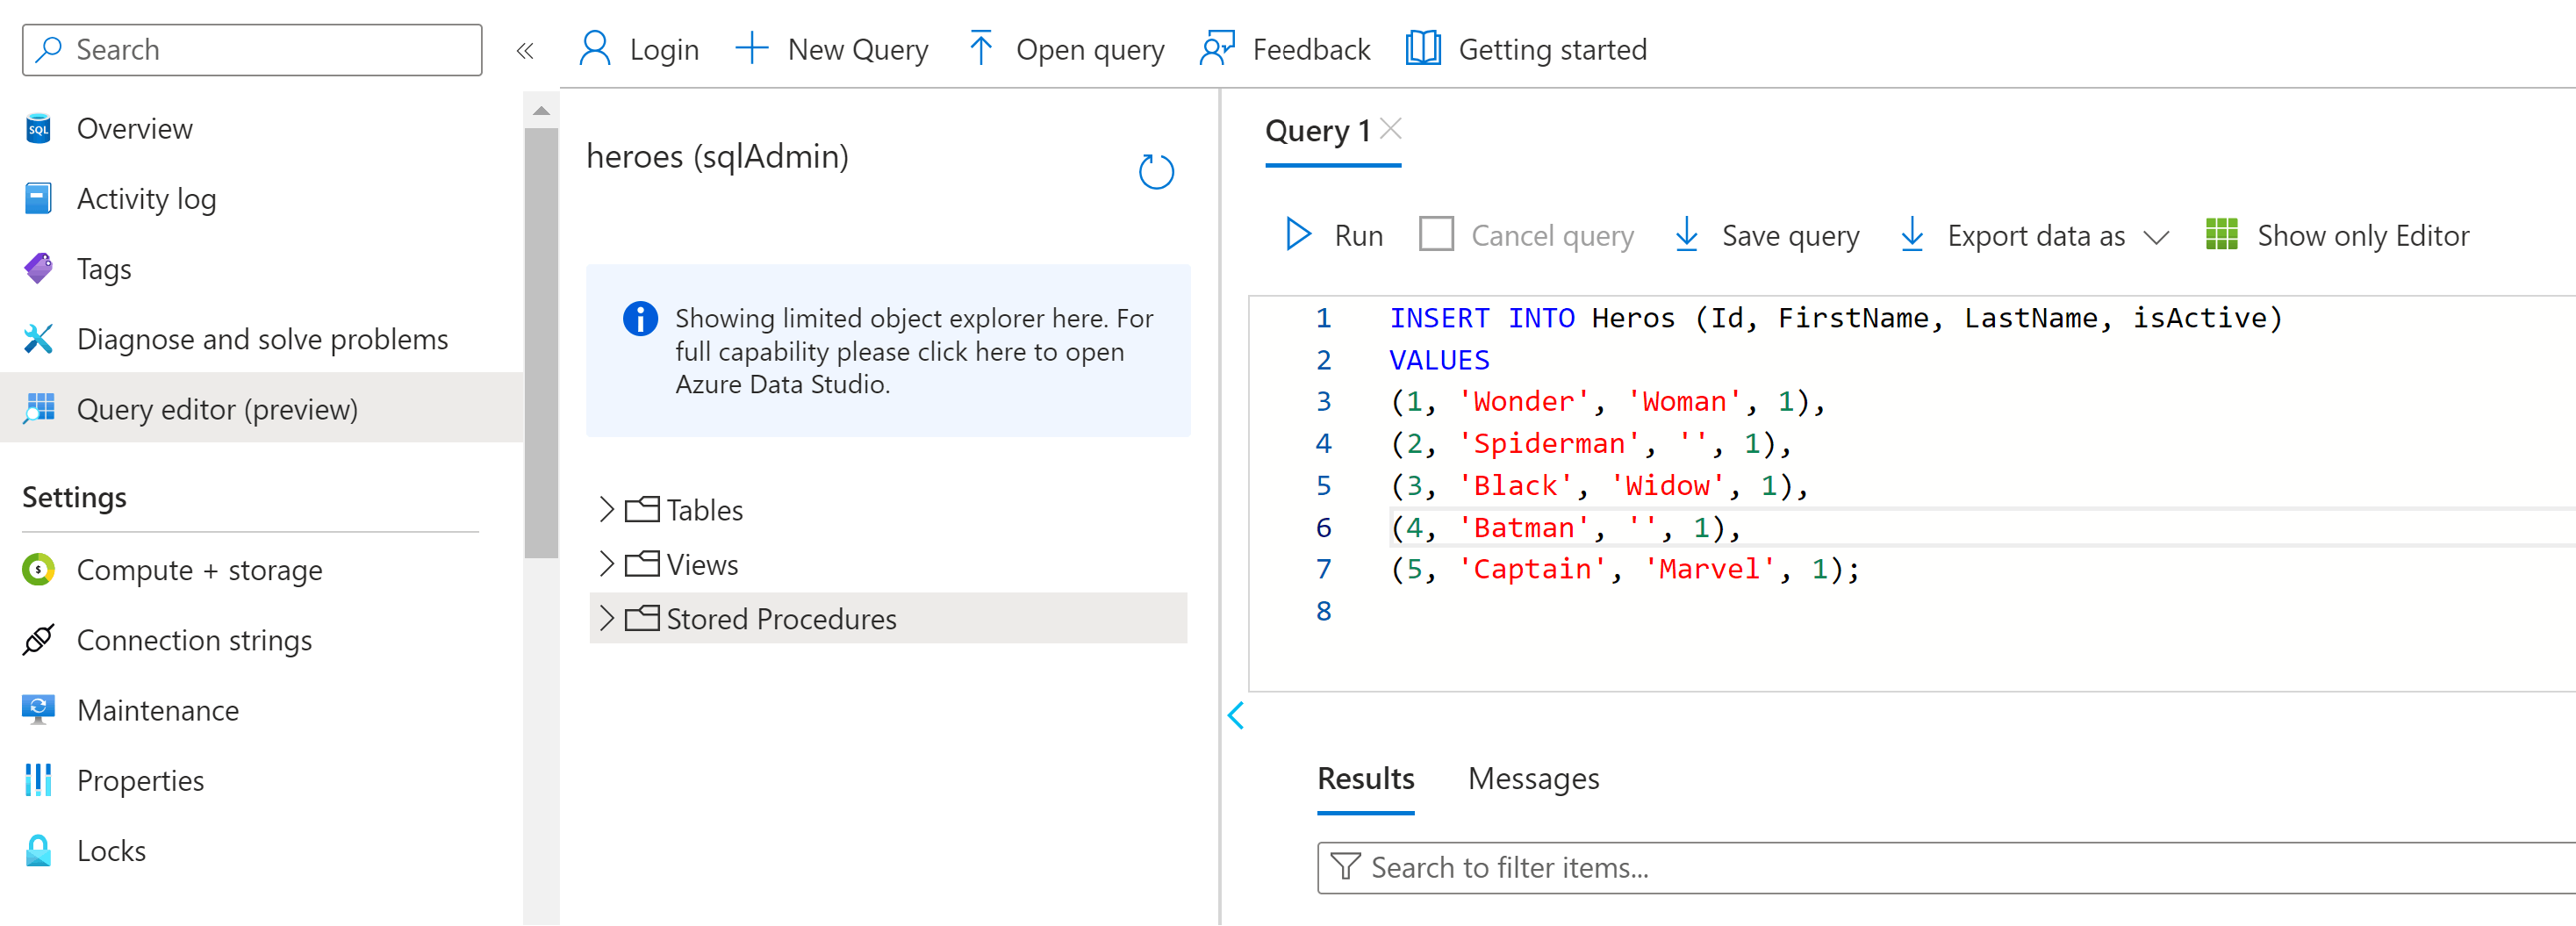
When you are logged into the SQL Server, run the below query to add a table

Run the below query to insert sample data into the database.
Let’s copy out the connection string for use later. From Overview, click on Connection Strings, and copy the .NET connection string provided.
It will look like this:
Server=tcp:apisqlserver.database.windows.net,1433;Initial Catalog=heroes;Persist Security Info=False;User ID=XXXXX;Password={your_password};MultipleActiveResultSets=False;Encrypt=True;TrustServerCertificate=False;Connection Timeout=30;
Replace {your_password} with the password you chose for the admin.
Set Up the .Net Web API Project
Now we will create our .NET Web API to perform CRUD operations on our Database
Step 1. Open visual studio and click on “Create a new project”.
Step 2. Select the “ASP .NET Core Web API” template and click on the “Next” button.
Step 3. Enter the “Project Name” CrudWebApi and click the “Next” button.
Step 4
Select Framework .Net 8.0 (Long-Term Support)
Check “Configuration for HTTPS”
“Enable Open API Support”
Enable Use Controllers
Click on “Next” to proceed.
Step 5. Install Entity Framework Package from NuGet.
Right Click on your project -> Click on”Manage NuGet Packages” -> Open “Browse” tab -> search below EF8 package
Microsoft.EntityFrameworkCore
Microsoft.EntityFrameworkCore.SqlServer
Step 6. Add HeroDbContext file in our project .
Open a solution
Right-click and add the “Entity” folder
add HeroDbContext class
inherit DbContext class
Add constructor and accept EF option and send to DbContext
// HeroDbContext.cs
using Microsoft.EntityFrameworkCore;
using CrudWebApi.Model;
namespace CrudWebApi
{
    public class HeroDbContext : DbContext
    {
        public HeroDbContext(DbContextOptions<HeroDbContext> options) : base(options)
        {
        }

        public DbSet<Hero> Heros { get; set; }

        protected override void OnModelCreating(ModelBuilder modelBuilder)
        {
            modelBuilder.Entity<Hero>().Property(x => x.Id).ValueGeneratedOnAdd();

        }
    }
}
Step 7. Add ConnectionStrings in appsettings.json file
//appsettings.json
{
  "Logging": {
    "LogLevel": {
      "Default": "Information",
      "Microsoft.AspNetCore": "Warning"

    }
  },
  "ConnectionStrings": {
    "HeroConnectionString": "Your-Connection-String"
  },
  "AllowedHosts": "*"
}
Step 5. Register DbContext
Add the following line in your Program.cs file
builder.Services.AddDbContext<OurHeroDbContext>(db => db.UseSqlServer(builder.Configuration.GetConnectionString("HeroConnectionString")), ServiceLifetime.Singleton);
Step 5. Let’s delete the existing WeatherForecast Controller and add a new HeroController to this project.
- Right-click on the Controller folder ( go to Open Solution Explorer and select Controller folder).
Select API -> “API Controller — Empty” and click on the “Add” button.
Enter the Controller name HeroController and click on the Add button to generate a template for this.
Step 6. Let’s add the below folder to our solution.
Model
Services
Right-click on Solution -> Add -> New Forder
Step 7. Add Hero Model in the model folder.
Right-click on Model folder -> Add -> New Item -> Enter Class(Model Name like Hero.cs) Name and press the Add button.
// Hero.cs
using System.ComponentModel.DataAnnotations.Schema;
using System.ComponentModel.DataAnnotations;

namespace CrudWebApi.Model
{
    public class Hero
    {
    [Key]
    [DatabaseGenerated(DatabaseGeneratedOption.Identity)]
    public int Id { get; set; }
    public required string FirstName { get; set; }
    public string LastName { get; set; } = string.Empty;
    public bool isActive { get; set; } = true;
    }
}
AddUpdateHero.cs model is being used to add or update hero list.
//AddUpdateHero.cs
namespace CrudWebApi.Model
{
    public class AddUpdateHero
    {
    public required string FirstName { get; set; }
    public string LastName { get; set; } = string.Empty;
    public bool isActive { get; set; } = true;
    }
}
Step 8. Create Service files.
IHeroService: Interface to define Hero business logic
HeroService: Class to implement IHeroService methods.
// IHeroService.cs

using CrudWebApi.Model;
namespace CrudWebApi.Services
{
    public interface IHeroService
    {
        Task<List<Hero>> GetAllHeros(bool? isActive);
        Task<Hero?> GetHerosByID(int id);
        Task<Hero?> AddHero(AddUpdateHero obj);
        Task<Hero?> UpdateHero(int id, AddUpdateHero obj);
        Task<bool> DeleteHerosByID(int id);
    }
}
// HeroService.cs
using CrudWebApi.Model;
using Microsoft.EntityFrameworkCore;
namespace CrudWebApi.Services
{
    public class HeroService : IHeroService
    {
        private readonly HeroDbContext _db;
        public HeroService(HeroDbContext db)
        {
            _db = db;
        }
        public async Task<List<Hero>> GetAllHeros(bool? isActive)
        {
            if (isActive != null)
            {
                return await _db.Heros.Where(m => m.isActive == isActive).ToListAsync();
            }
            return await _db.Heros.ToListAsync();
        }

        public async Task<Hero?> GetHerosByID(int id)
        {
            return await _db.Heros.FirstOrDefaultAsync(hero => hero.Id == id);
        }

        public async Task<Hero?> AddHero(AddUpdateHero obj)
        {
            var addHero = new Hero()
            {
                FirstName = obj.FirstName,
                LastName = obj.LastName,
                isActive = obj.isActive,
            };
            addHero.Id = _db.Heros.Max(h => h.Id) + 1;
            _db.Heros.Add(addHero);
            var result = await _db.SaveChangesAsync();
            return result >= 0 ? addHero : null;
        }

        public async Task<Hero?> UpdateHero(int id, AddUpdateHero obj)
        {
            var hero = await _db.Heros.FirstOrDefaultAsync(index => index.Id == id);
            if (hero != null)
            {
                hero.FirstName = obj.FirstName;
                hero.LastName = obj.LastName;
                hero.isActive = obj.isActive;

                var result = await _db.SaveChangesAsync();
                return result >= 0 ? hero : null;
            }
            return null;
        }

        public async Task<bool> DeleteHerosByID(int id)
        {
            var hero = await _db.Heros.FirstOrDefaultAsync(index => index.Id == id);
            if (hero != null)
            {
                _db.Heros.Remove(hero);
                var result = await _db.SaveChangesAsync();
                return result >= 0;
            }
            return false;
        }
    }
}
In the service file, we are using the database collection to store all _ourHeroesList data.
Step 9. Register HeroService service in the Program.cs file as a Singleton.
//Program.cs
builder.Services.AddSingleton<IHeroService, HeroService>();
Our Final Program.cs should look like
// Program.cs
using CrudWebApi;
using CrudWebApi.Services;
using Microsoft.EntityFrameworkCore;

var builder = WebApplication.CreateBuilder(args);


// Add services to the container.
string connectionString = builder.Configuration.GetConnectionString("HeroConnectionString");
builder.Services.AddDbContext<HeroDbContext>(options => options.UseSqlServer(connectionString), ServiceLifetime.Singleton);

builder.Services.AddSingleton<IHeroService, HeroService>();
builder.Services.AddControllers();
// Learn more about configuring Swagger/OpenAPI at https://aka.ms/aspnetcore/swashbuckle
builder.Services.AddEndpointsApiExplorer();
builder.Services.AddSwaggerGen();

var app = builder.Build();

// Configure the HTTP request pipeline.
if (app.Environment.IsDevelopment())
{
    app.UseSwagger();
    app.UseSwaggerUI();
}

app.UseHttpsRedirection();

app.UseAuthorization();

app.MapControllers();

app.Run();
Step 10. Inject IHeroService in HeroController.
Open HeroController file
Add a Contractor
inject IHeroService in the Contractor
Add action methods in HeroController
Get - to fetch all heros
Get ID — to fetch Hero by ID
Post — Add new Hero
Put — Update Hero
Delete- delete Hero by ID
using CrudWebApi.Model;
using CrudWebApi.Services;
using Microsoft.AspNetCore.Http;
using Microsoft.AspNetCore.Mvc;

namespace CrudWebApi.Controllers
{
    [Route("api/[controller]")]
    [ApiController]
    public class HeroController : ControllerBase
    {
        private readonly IHeroService _heroService;
        public HeroController(IHeroService heroService)
        {
            _heroService = heroService;
        }

        [HttpGet]
        public async Task<IActionResult> Get([FromQuery] bool? isActive = null)
        {
            var heros = await _heroService.GetAllHeros(isActive);
            return Ok(heros);
        }

        [HttpGet("{id}")]
        //[Route("{id}")] // /api/Hero/:id
        public async Task<IActionResult> Get(int id)
        {
            var hero = await _heroService.GetHerosByID(id);
            if (hero == null)
            {
                return NotFound();
            }
            return Ok(hero);
        }

        [HttpPost]
        public async Task<IActionResult> Post([FromBody] AddUpdateHero heroObject)
        {
            var hero = await _heroService.AddHero(heroObject);

            if (hero == null)
            {
                return BadRequest();
            }

            return Ok(new
            {
                message = "Super Hero Created Successfully!!!",
                id = hero!.Id
            });
        }

        [HttpPut]
        [Route("{id}")]
        public async Task<IActionResult> Put([FromRoute] int id, [FromBody] AddUpdateHero heroObject)
        {
            var hero = await _heroService.UpdateHero(id, heroObject);
            if (hero == null)
            {
                return NotFound();
            }

            return Ok(new
            {
                message = "Super Hero Updated Successfully!!!",
                id = hero!.Id
            });
        }

        [HttpDelete]
        [Route("{id}")]
        public async Task<IActionResult> Delete([FromRoute] int id)
        {
            if (!await _heroService.DeleteHerosByID(id))
            {
                return NotFound();
            }

            return Ok(new
            {
                message = "Super Hero Deleted Successfully!!!",
                id = id
            });
        }
    }
}
Step 11. Run our API project.
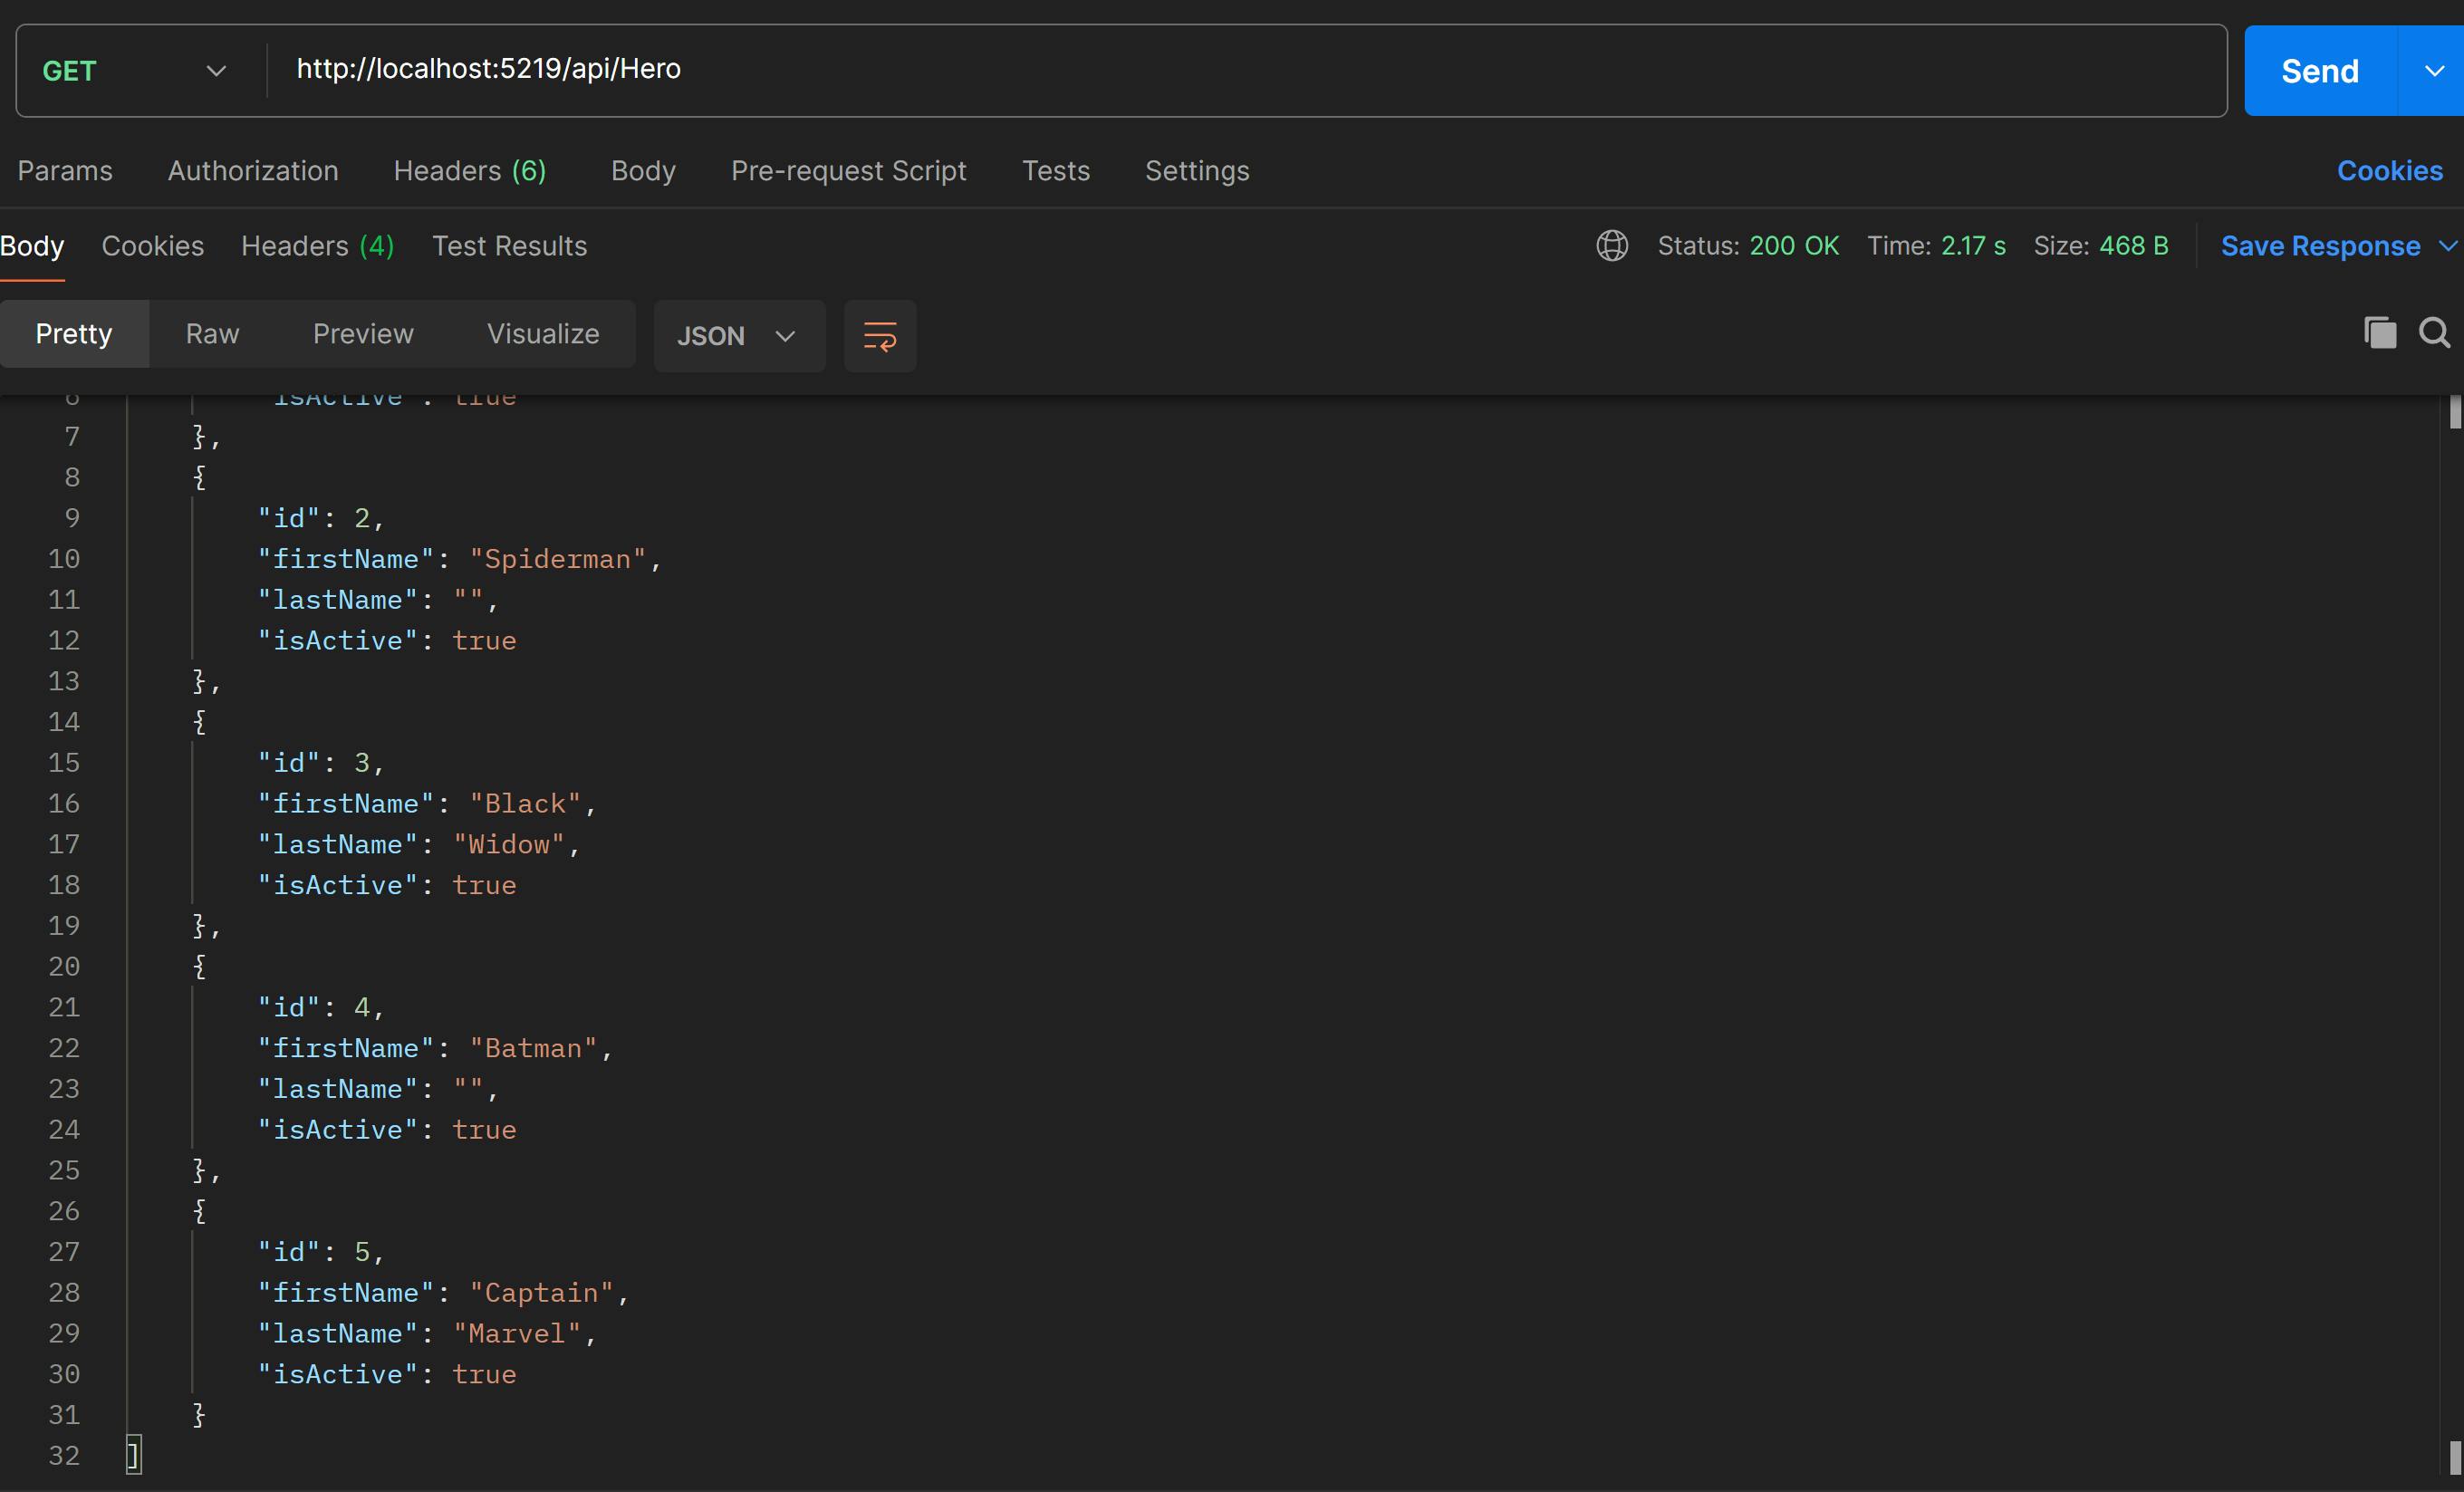
Step 12. Test in Postman.
List All Heros:
Add a Hero to the Database

Update a Hero in the database

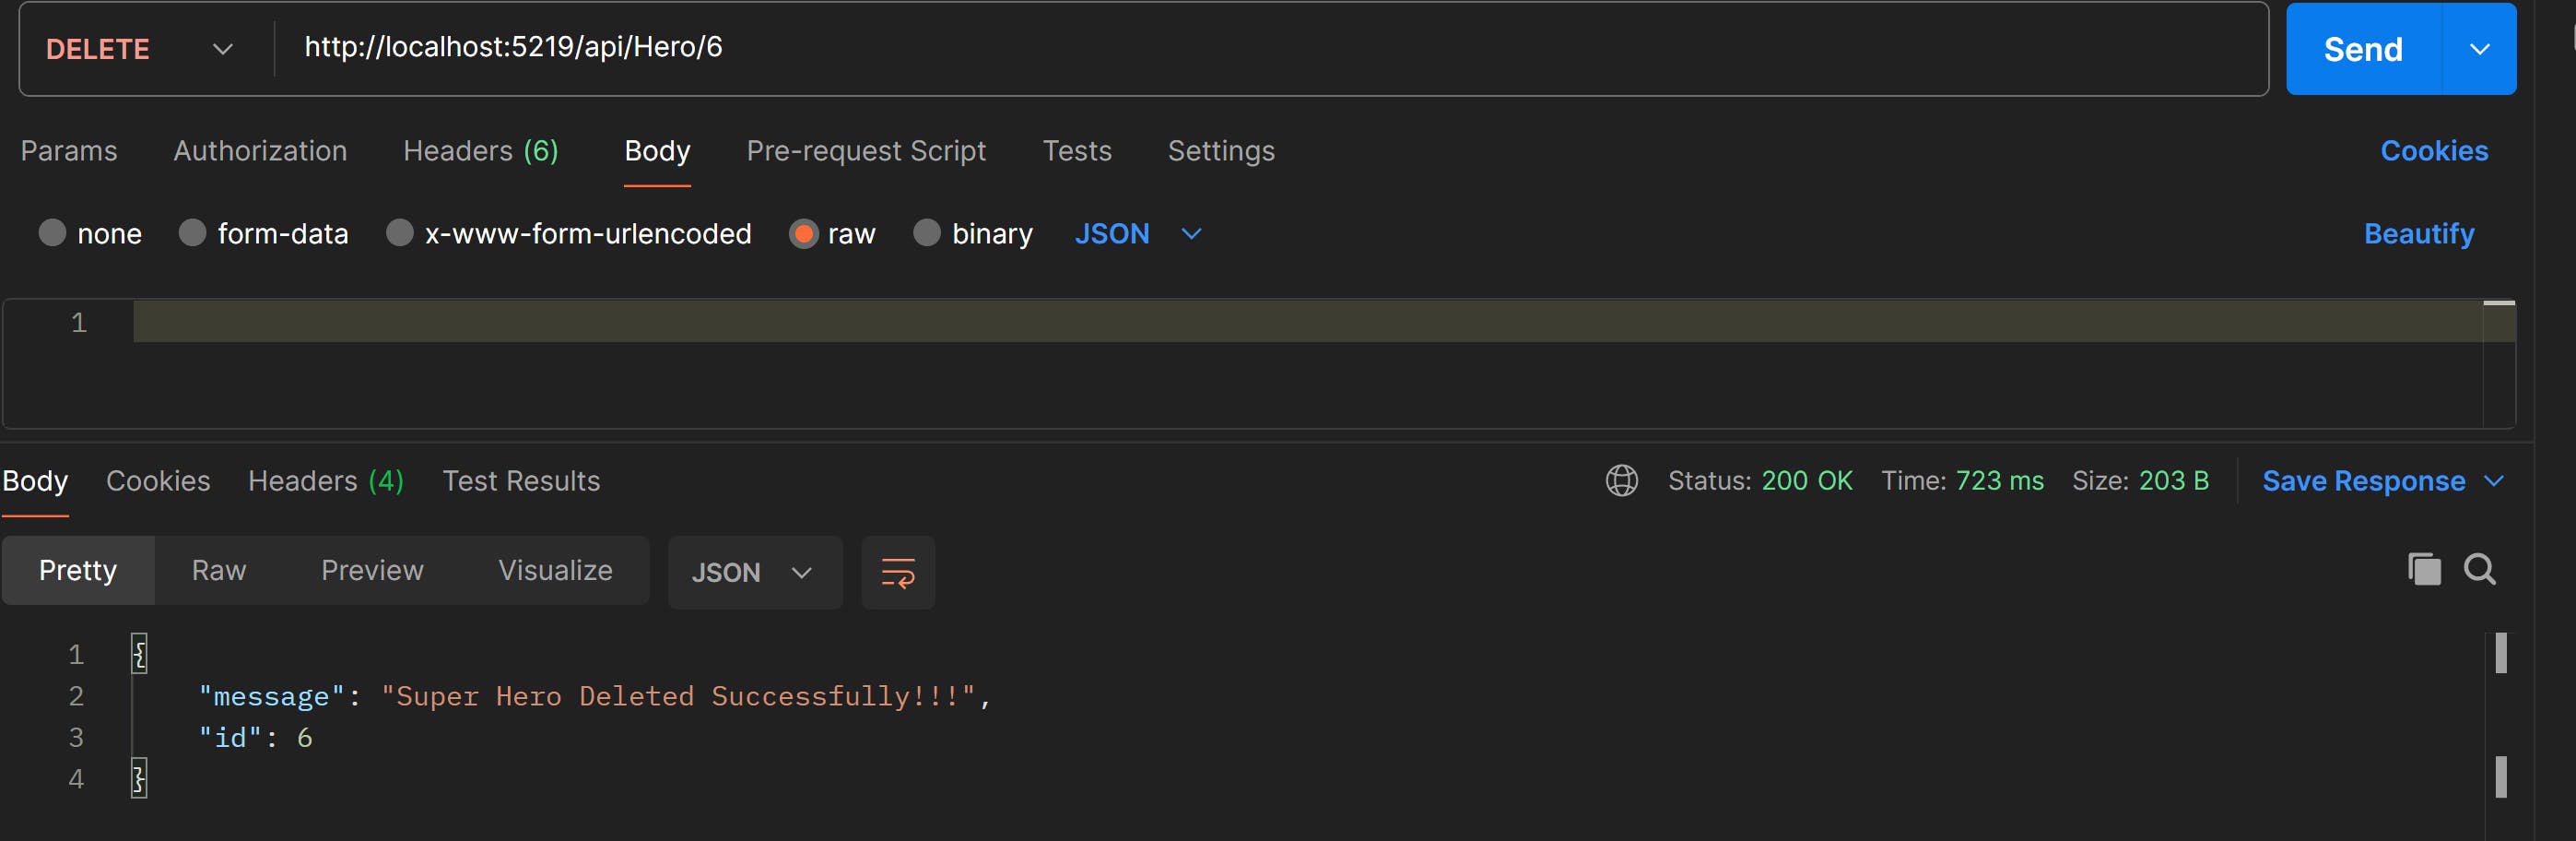
Delete a Hero from the database
Get a specific Hero by id

That's it we've built a CRUD .Net api :)
Push solution to GitHub
When we push our solution to a Git repository, we should avoid storing sensitive information, such as connection strings, directly in our source code, especially if the repository is public or accessible to multiple people. Instead, it's common practice to use configuration files or environment variables for managing sensitive information.
We will remove the connection string value and push our solution to GitHub
//appsettings.json
{
  "Logging": {
    "LogLevel": {
      "Default": "Information",
      "Microsoft.AspNetCore": "Warning"

    }
  },
  "ConnectionStrings": {
    "HeroConnectionString": ""
  },
  "AllowedHosts": "*"
}
Right-click on your solution > Create repository > Click Create and Push
My GitHub Repo https://github.com/Selmouni-Abdelilah/CrudWebApi.git
In the next blog ,we will Deploy our API to Azure Web App and we'll use Azure Key Vault Secrets to secure and access DB Connection Strings in .NET Core
Check it out here : part2