Create and Deploy a .NET Web API for CRUD operations to Azure using GitHub Actions #Part 2


Introduction:
In the initial phase of our series, we successfully crafted a .NET Web API and thoroughly tested it in a local environment.
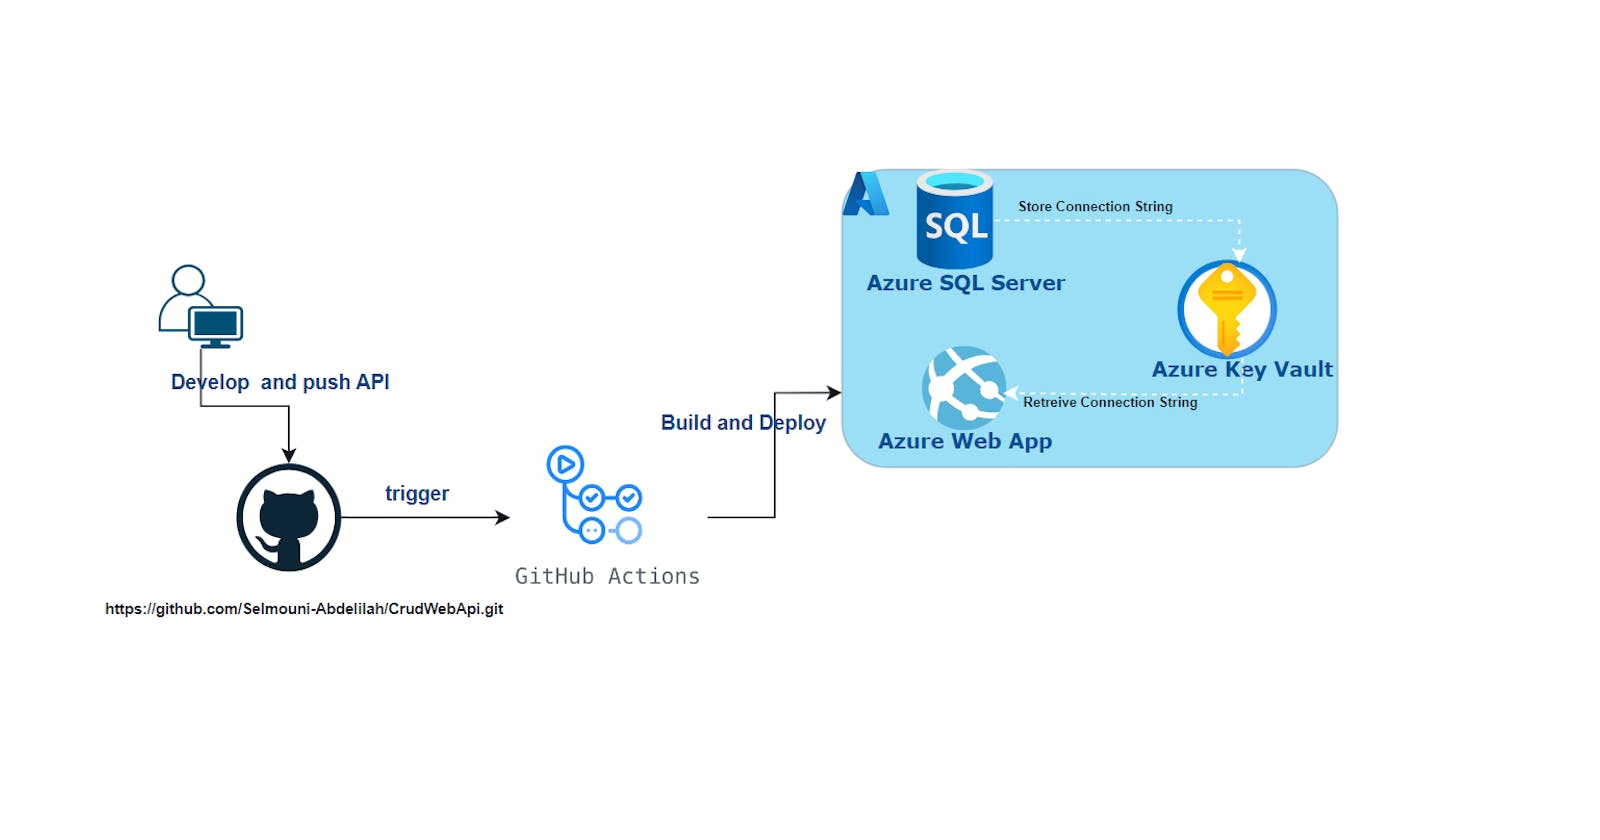
In the second part of our series, we'll take the .NET API created in Part 1 and deploy it to Azure Web App using GitHub Actions.
You have the option to either clone a functional local development version of the .NET API from my GitHub repository or construct it from scratch by following the instructions outlined in the preceding article of this series.
You can find the first part here : part1
Create an App Service plan
Create an App Service plan by using the Azure CLI az appservice plan create command. We will create an App Service plan named apisvcplan in our resource group crud-api-rg ,in the FREE pricing tier:
az appservice plan create --name apisvcplan --resource-group crud-api-rg --sku FREE
Create a web app
Create an Azure web app in the apisvcplan App Service plan.
az webapp create --resource-group crud-api-rg --plan apisvcplan --name crudapiazure
As we discussed in the previous article we will store our database connection string in an Azure Key Vault. Let's Go
Create a key vault
Using the Azure CLI az keyvault create command we will create a Key Vault in the resource group crud-api-rg
az keyvault create --name "<your-unique-keyvault-name>" --resource-group crud-api-rg --location "EastUS"
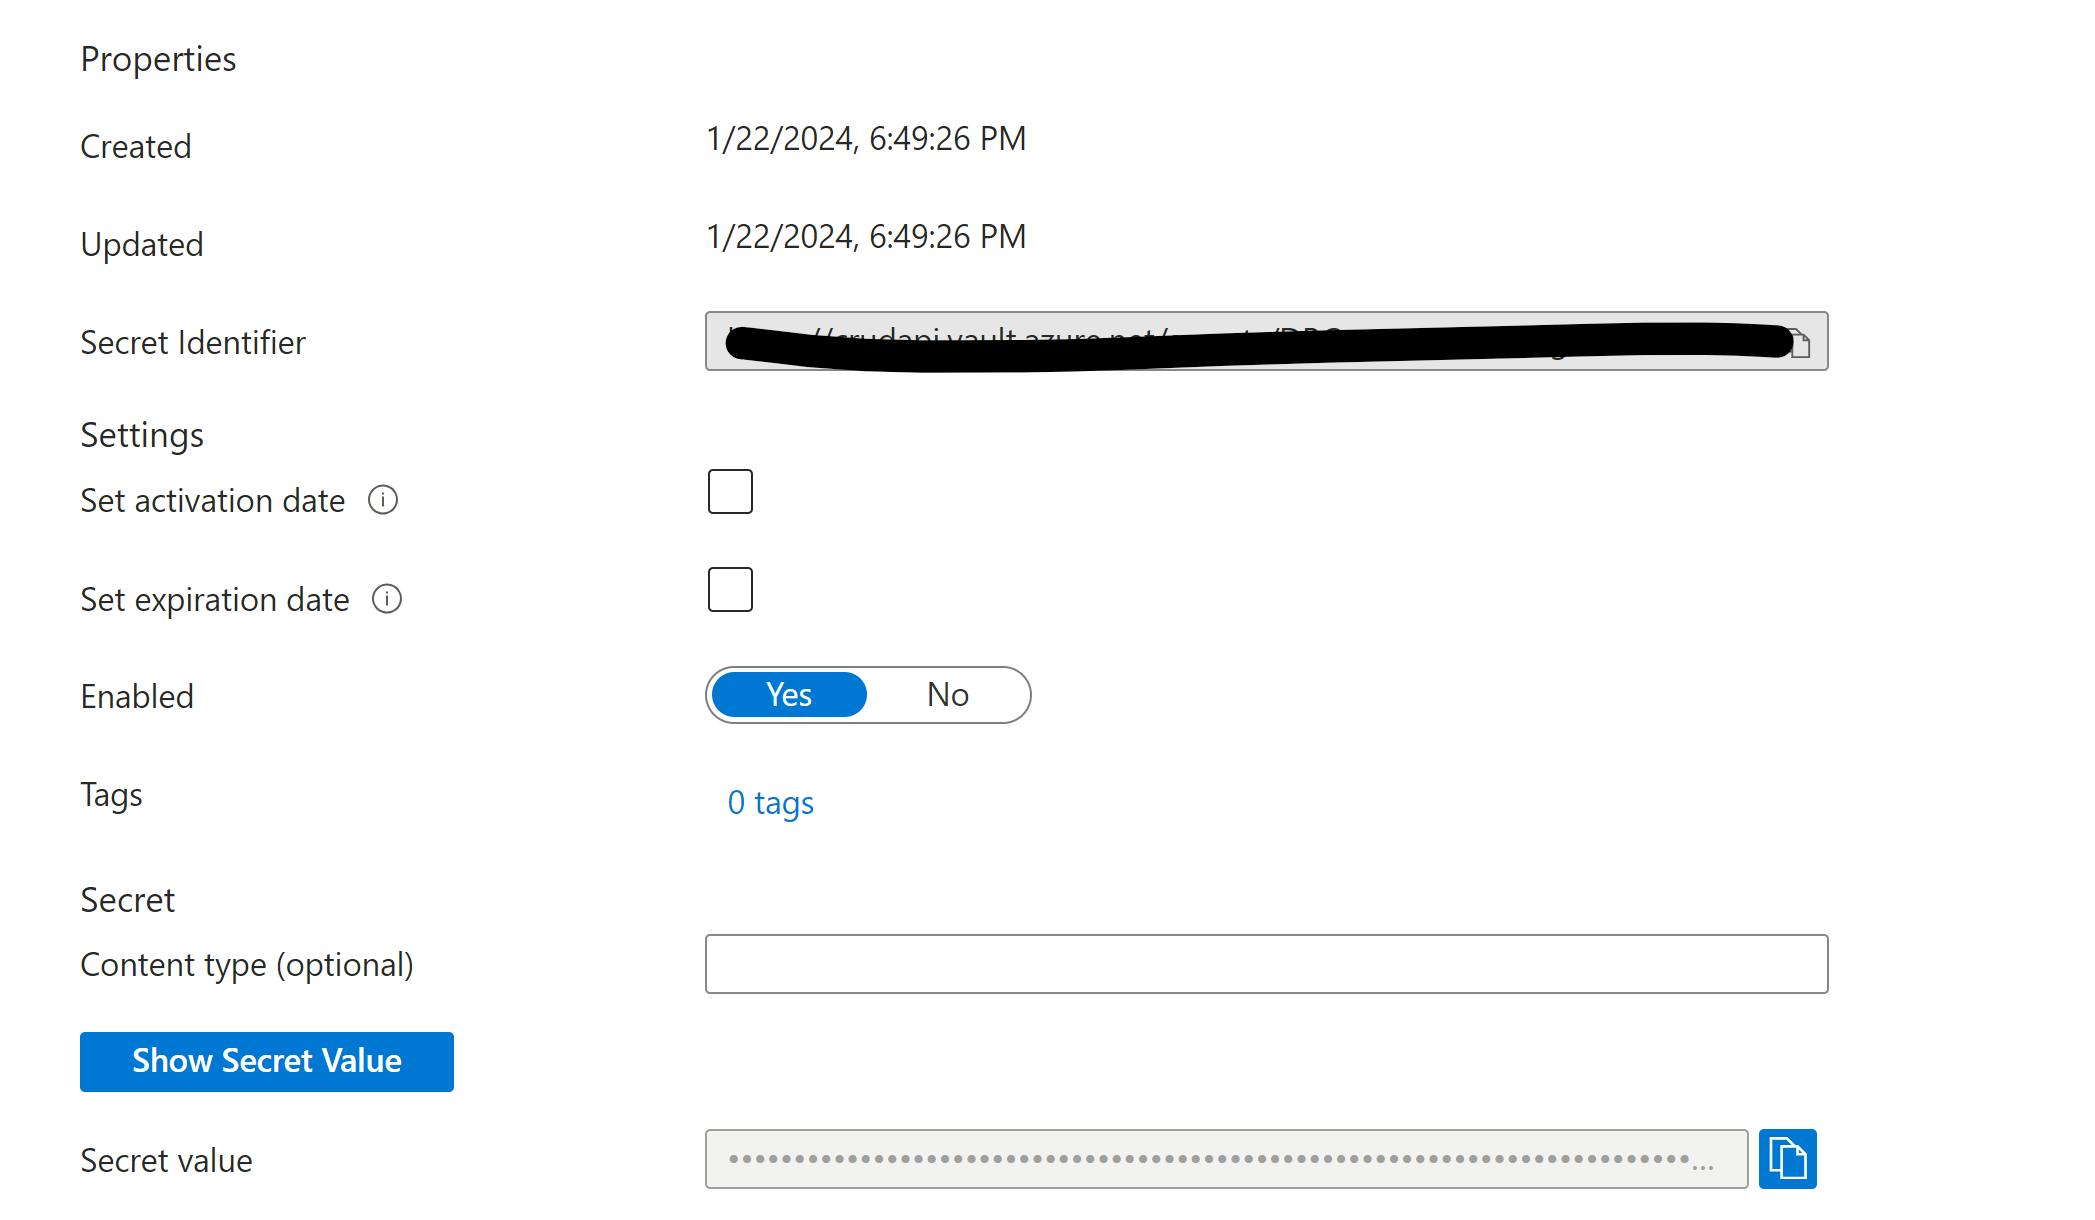
Add database connection string secret to Key Vault
To add a secret to the vault, you just need to take a couple of additional steps. This password could be used by an application.
az keyvault secret set --vault-name "<your-unique-keyvault-name>" --name "DbConnectionString" --value "<connection_string>"
Replace the "<connection_string>" with the connection string from the previous article
Access the azure portal and navigate to your resource group and then to your key vault> Navigate to Secrets section you should find the newly created secret DbConnectionString . Access that secret and copy the Secret Identifier to be used later
Configure the web app to connect to Key Vault
In this section, we'll configure the web app to access to Key Vault to retrieve the database connection string secret from Key Vault.
Create and assign a managed identity
We'll use managed identity to authenticate to Key Vault. Managed identity automatically manages application credentials.
In the Azure CLI, to create the identity for the application, run the az webapp-identity assign command:
az webapp identity assign --name crudapiazure --resource-group crud-api-rg
Copy the principalId from the output of this command and pass it to the Azure CLI az keyvault set-policy command to give your web app permission to do get and list operations on your key vault
az keyvault set-policy --name crudapikeyvault --object-id "principalId" --secret-permissions get list
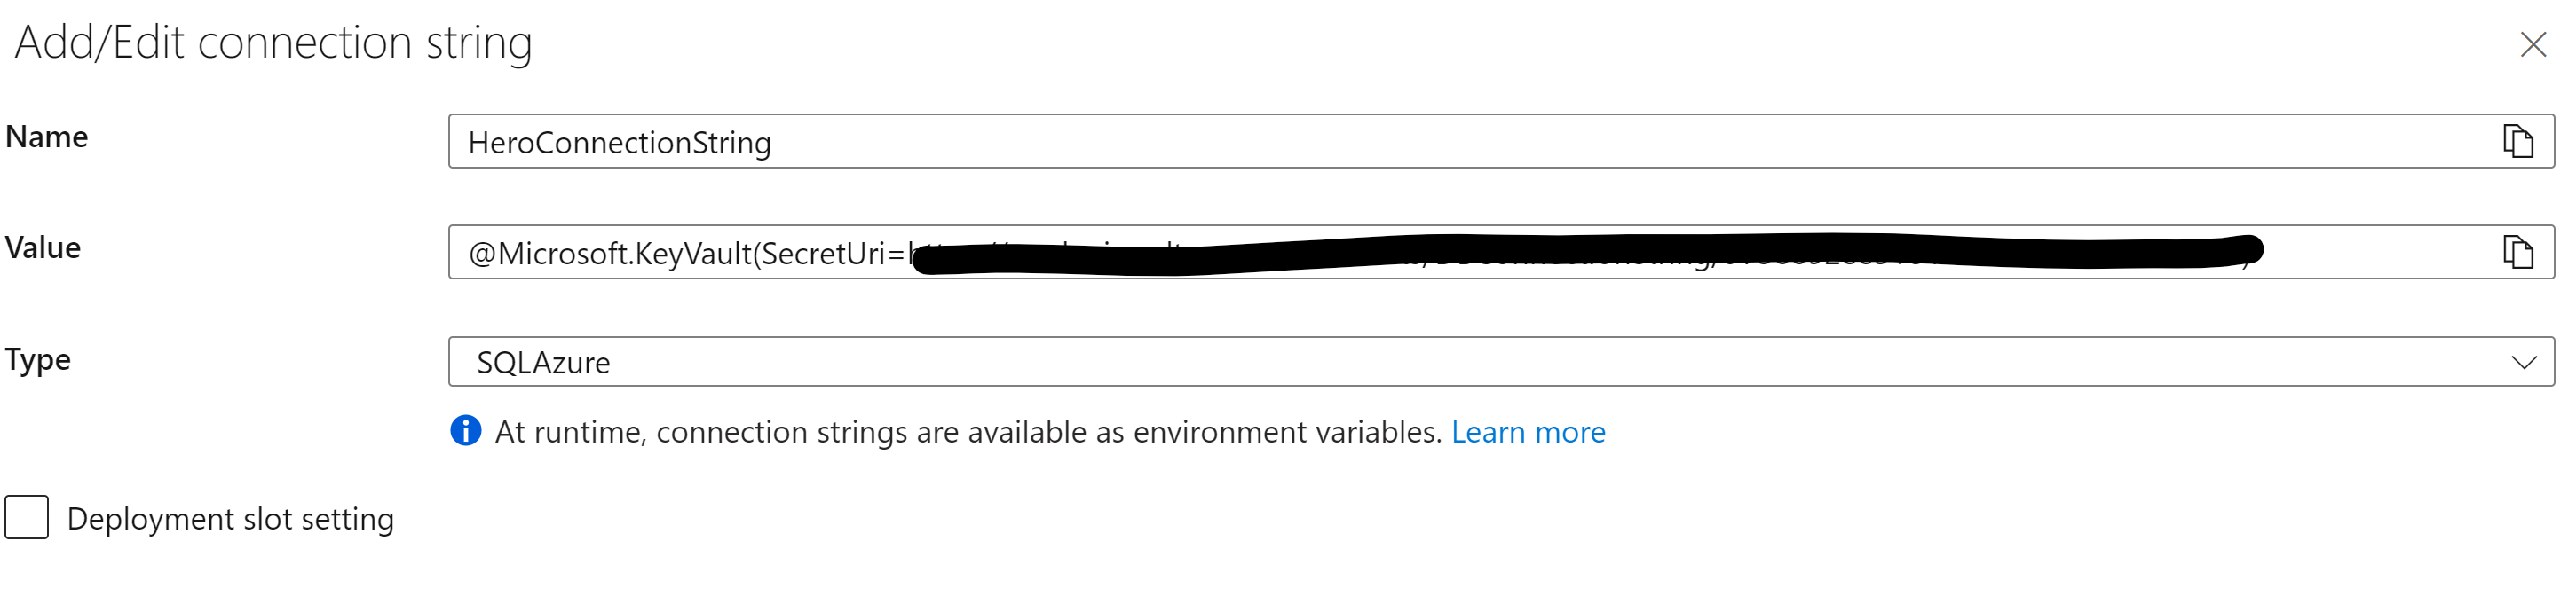
Add the connection string to the web app.
We will use az webapp config connection-string set command to set connection strings for our web app. In our case,we want to set the HeroConnectionString for our Azure Web App named crudapiazure.
Note: Secret Identifier you have copied and kept with you in the last section
az webapp config connection-string set \
  --resource-group crud-api-rg \          # Replace with your resource group name
  --name crudapiazure \                   # Replace with your web app name
  --settings HeroConnectionString='@Microsoft.KeyVault(SecretUri=<Secret Identifier>)' \ # Replace with your secret identifier
  -t SQLAzure                         # Specify the type of the connection string
Or you can do it from the portal. Navigate to your azure web app > configuration > and add a connection string
Now we are ready to deploy our .Net Web API.
Deploy the api to the web app with GitHub Actions
We need set up a deployment center to automate the deployment of our application whenever changes are pushed to the master branch of our GitHub repository.
We'll navigate to the Azure Portal, choose our Web App, and access the Deployment Center tab. Opt for GitHub as the source, then specify the repository and branch for deployment.
NB: We use the repository fot the web api created in the previous article
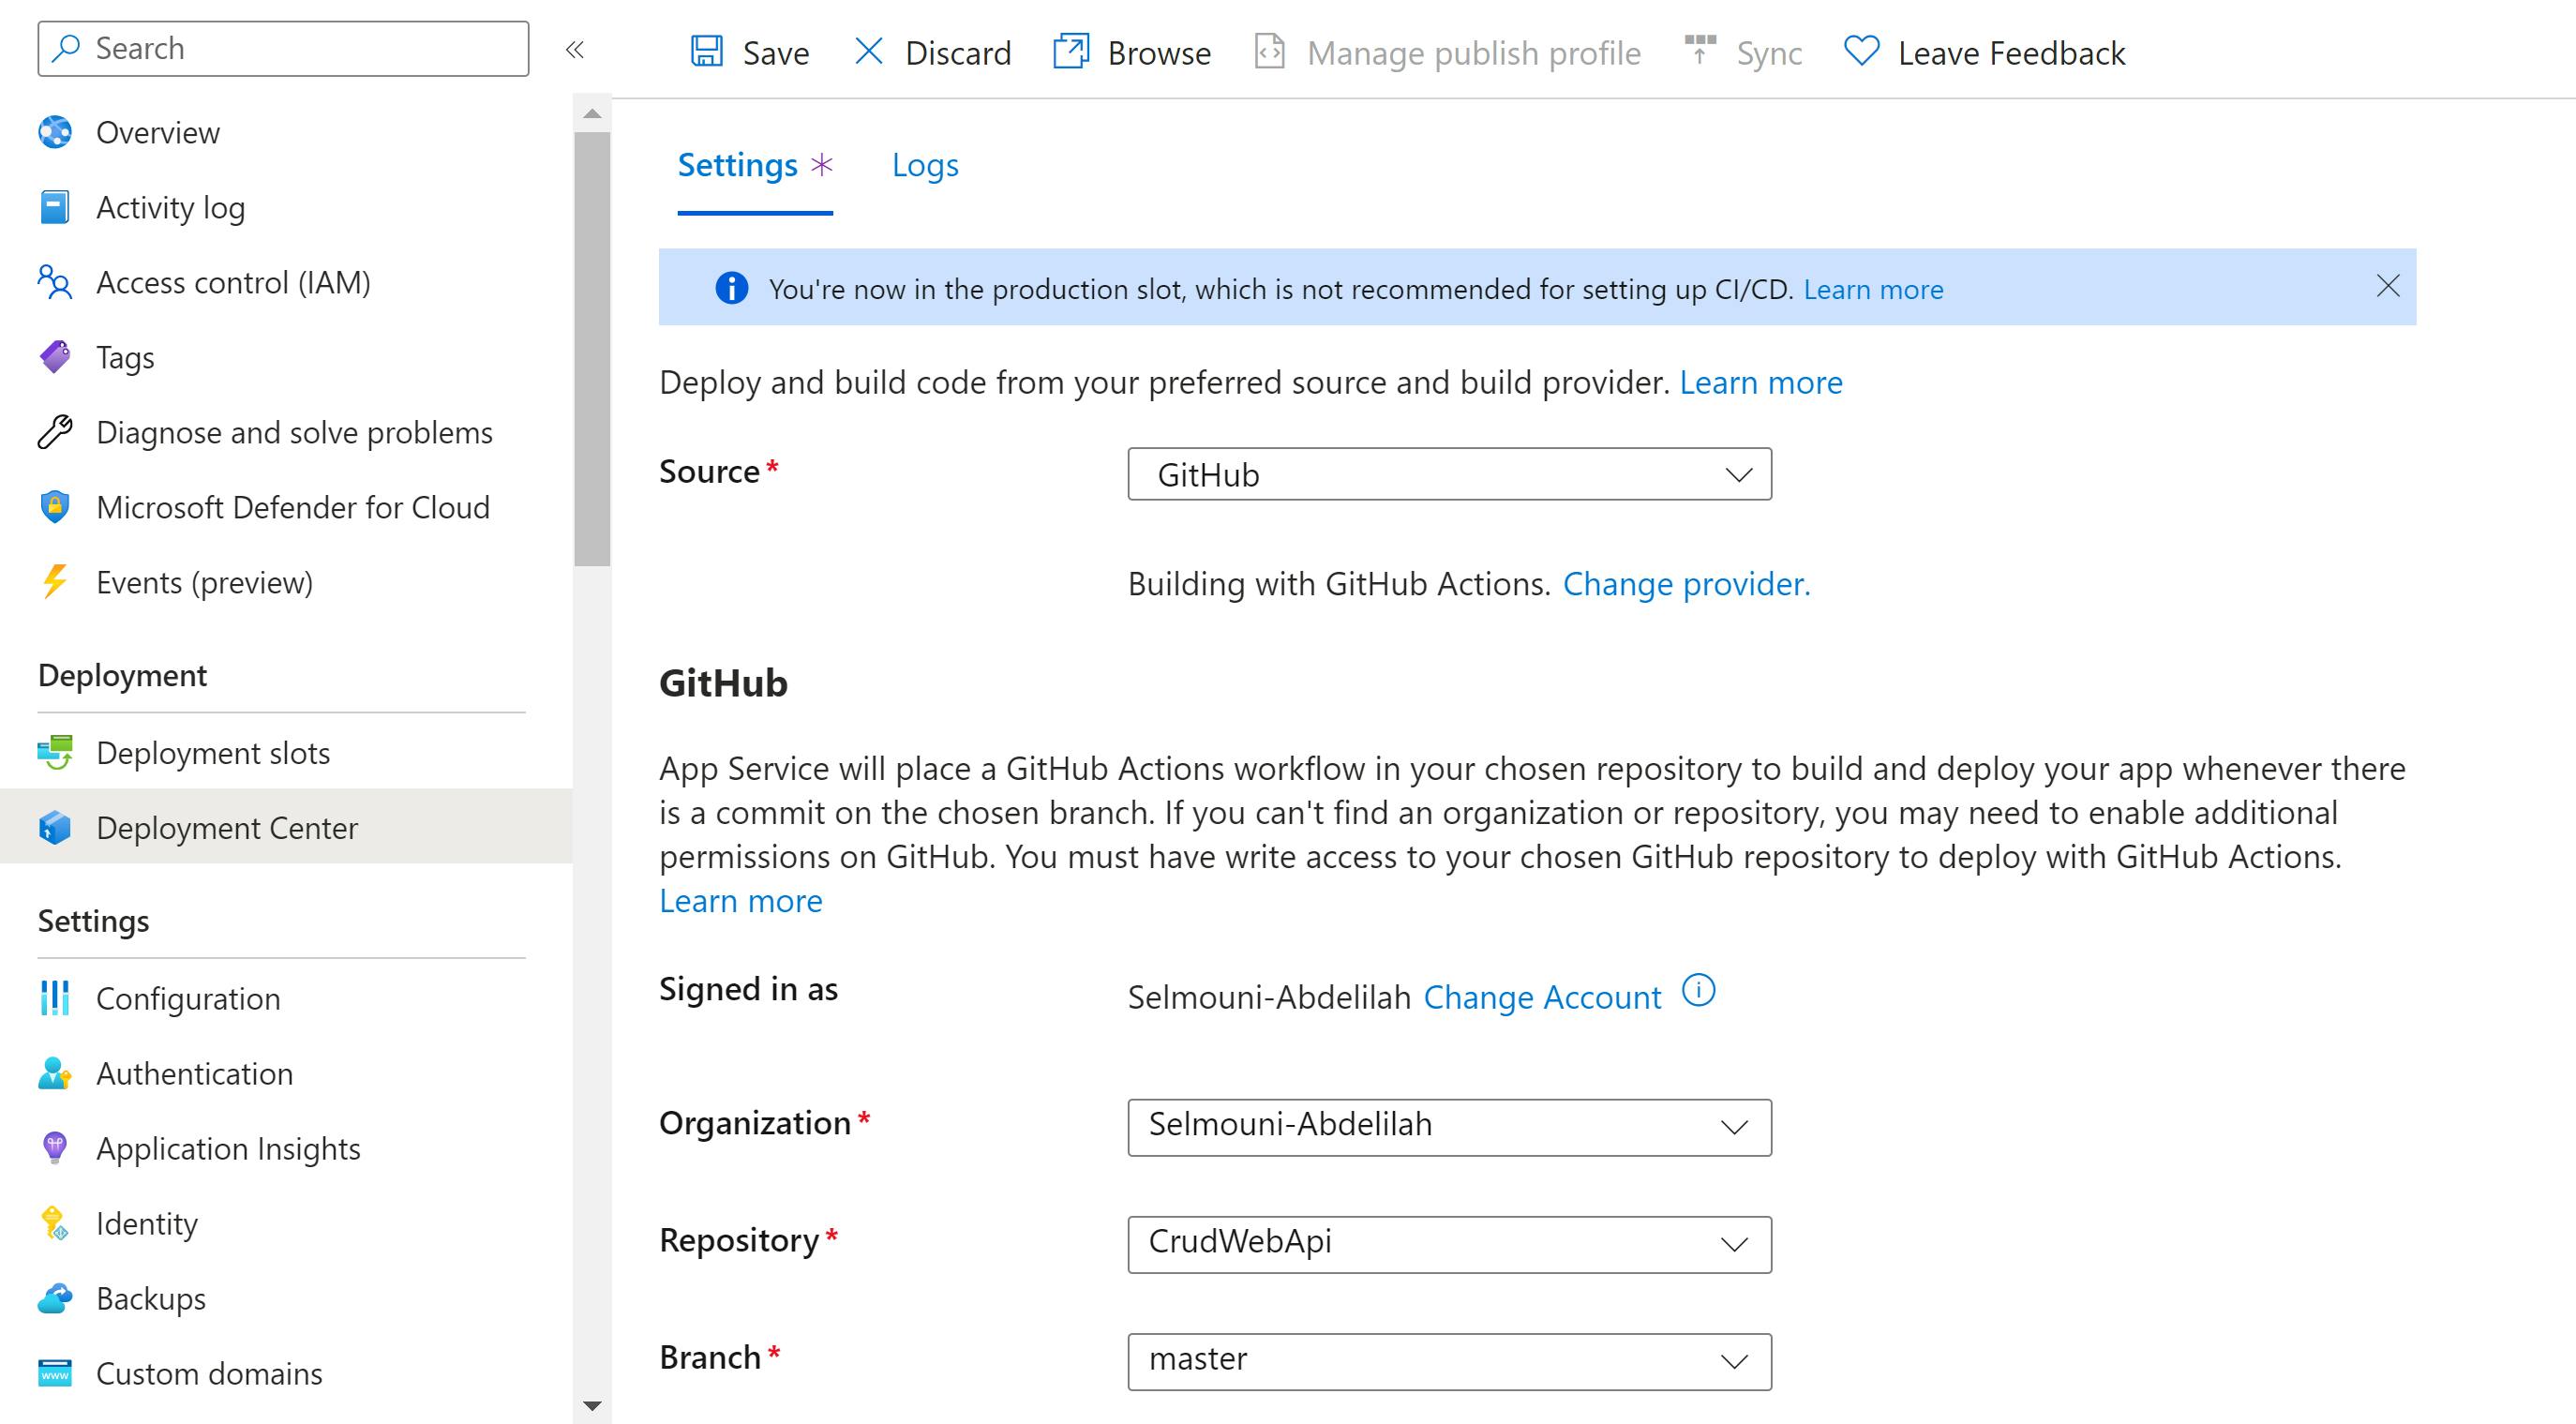
Save the configuration, and Azure will generate a new GitHub Action file, installing it in your repository.
The workflow file will look like this
# Docs for the Azure Web Apps Deploy action: https://github.com/Azure/webapps-deploy
# More GitHub Actions for Azure: https://github.com/Azure/actions

name: Build and deploy ASP.Net Core app to Azure Web App - crudapiazure

on:
  push:
    branches:
      - master
  workflow_dispatch:

jobs:
  build:
    runs-on: ubuntu-latest

    steps:
      - uses: actions/checkout@v4

      - name: Set up .NET Core
        uses: actions/setup-dotnet@v1
        with:
          dotnet-version: '8.x'
          include-prerelease: true

      - name: Build with dotnet
        run: dotnet build --configuration Release

      - name: dotnet publish
        run: dotnet publish -c Release -o ${{env.DOTNET_ROOT}}/myapp

      - name: Upload artifact for deployment job
        uses: actions/upload-artifact@v3
        with:
          name: .net-app
          path: ${{env.DOTNET_ROOT}}/myapp

  deploy:
    runs-on: ubuntu-latest
    needs: build
    environment:
      name: 'Production'
      url: ${{ steps.deploy-to-webapp.outputs.webapp-url }}
    permissions:
      id-token: write #This is required for requesting the JWT

    steps:
      - name: Download artifact from build job
        uses: actions/download-artifact@v3
        with:
          name: .net-app

      - name: Login to Azure
        uses: azure/login@v1
        with:
          client-id: ${{ secrets.AZUREAPPSERVICE_CLIENTID_785BF3FCAE4E4F758BF56C61B75DC6E8 }}
          tenant-id: ${{ secrets.AZUREAPPSERVICE_TENANTID_04821F2C0C1849F7A38280AEF903AE2E }}
          subscription-id: ${{ secrets.AZUREAPPSERVICE_SUBSCRIPTIONID_E81FA66A35DA4D9D9E55268A4858F8F5 }}

      - name: Deploy to Azure Web App
        id: deploy-to-webapp
        uses: azure/webapps-deploy@v2
        with:
          app-name: 'crudapiazure'
          slot-name: 'Production'
          package: .
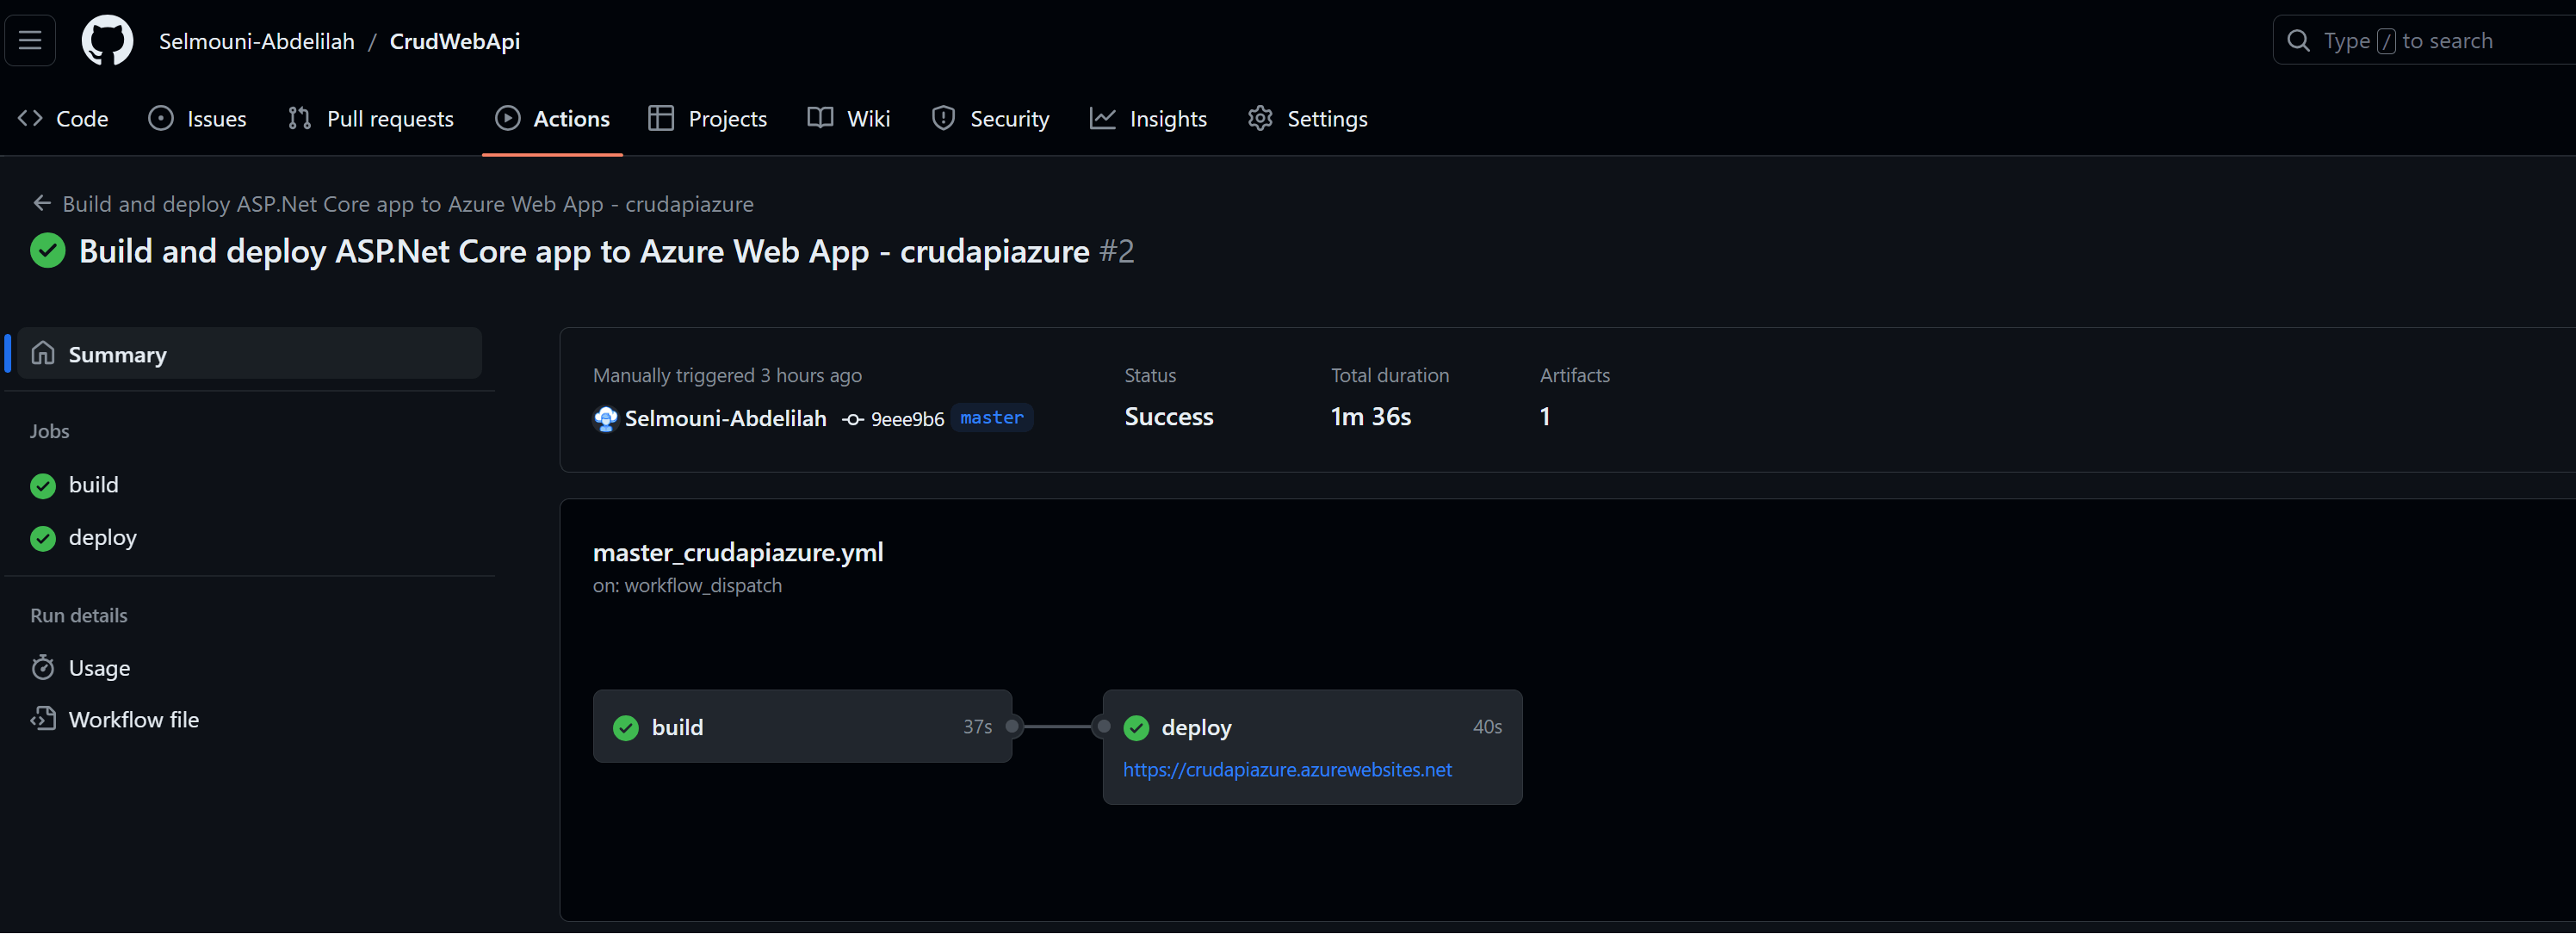
The provided GitHub Actions workflow will automate the build and deployment process of an .NET Web Api to our Azure Web App 'crudapiazure' Triggered on pushes to the master branch or manually, it consists of two jobs:
Build Job:
Builds the app in Release configuration.
Publishes the app to a specified directory.
Uploads the artifact for deployment.
Deployment Job:
Depends on the Build Job.
Specifies the deployment environment as 'Production.'
Downloads the artifact.
Logs in to Azure using service principal credentials.
Deploys the app to Azure Web App in the 'Production' slot.
Azure service principal credentials are stored automatically in GitHub Secrets.
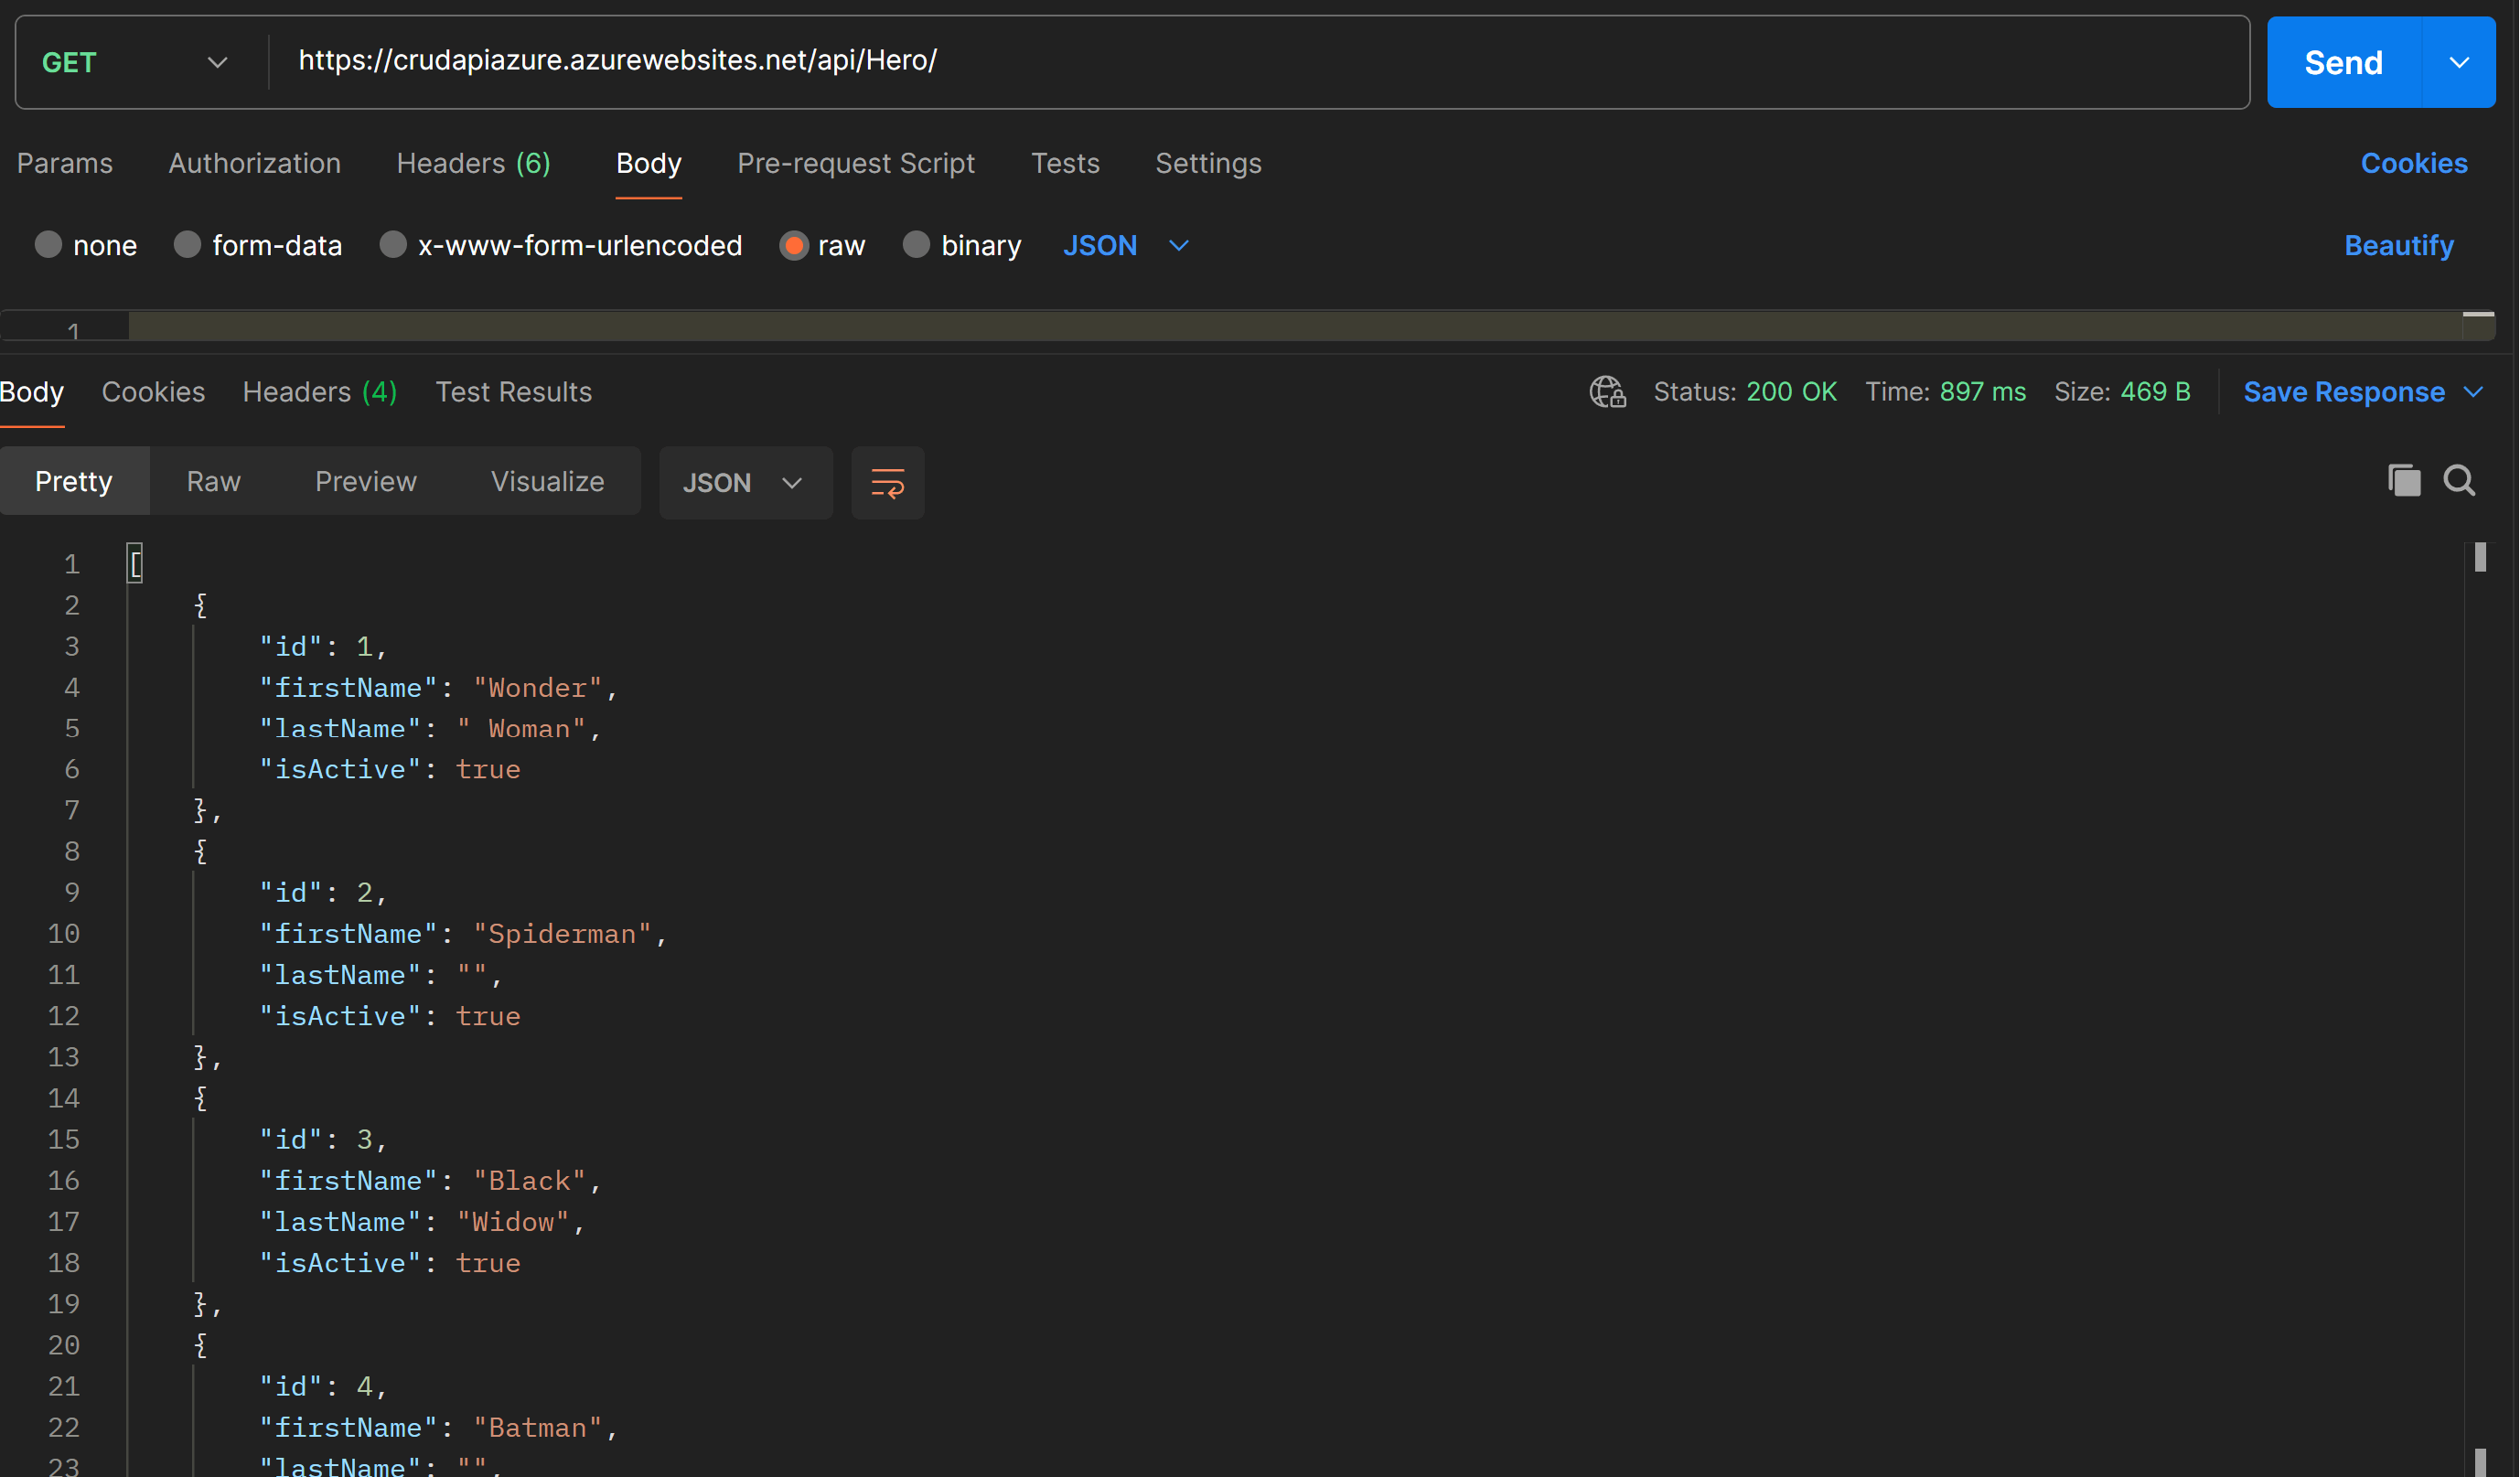
Test in Postman
Browse to the crudapiazure Web App Overview and copy the API URL endpoint. It should look something like this: https://crudapiazure.azurewebsites.net
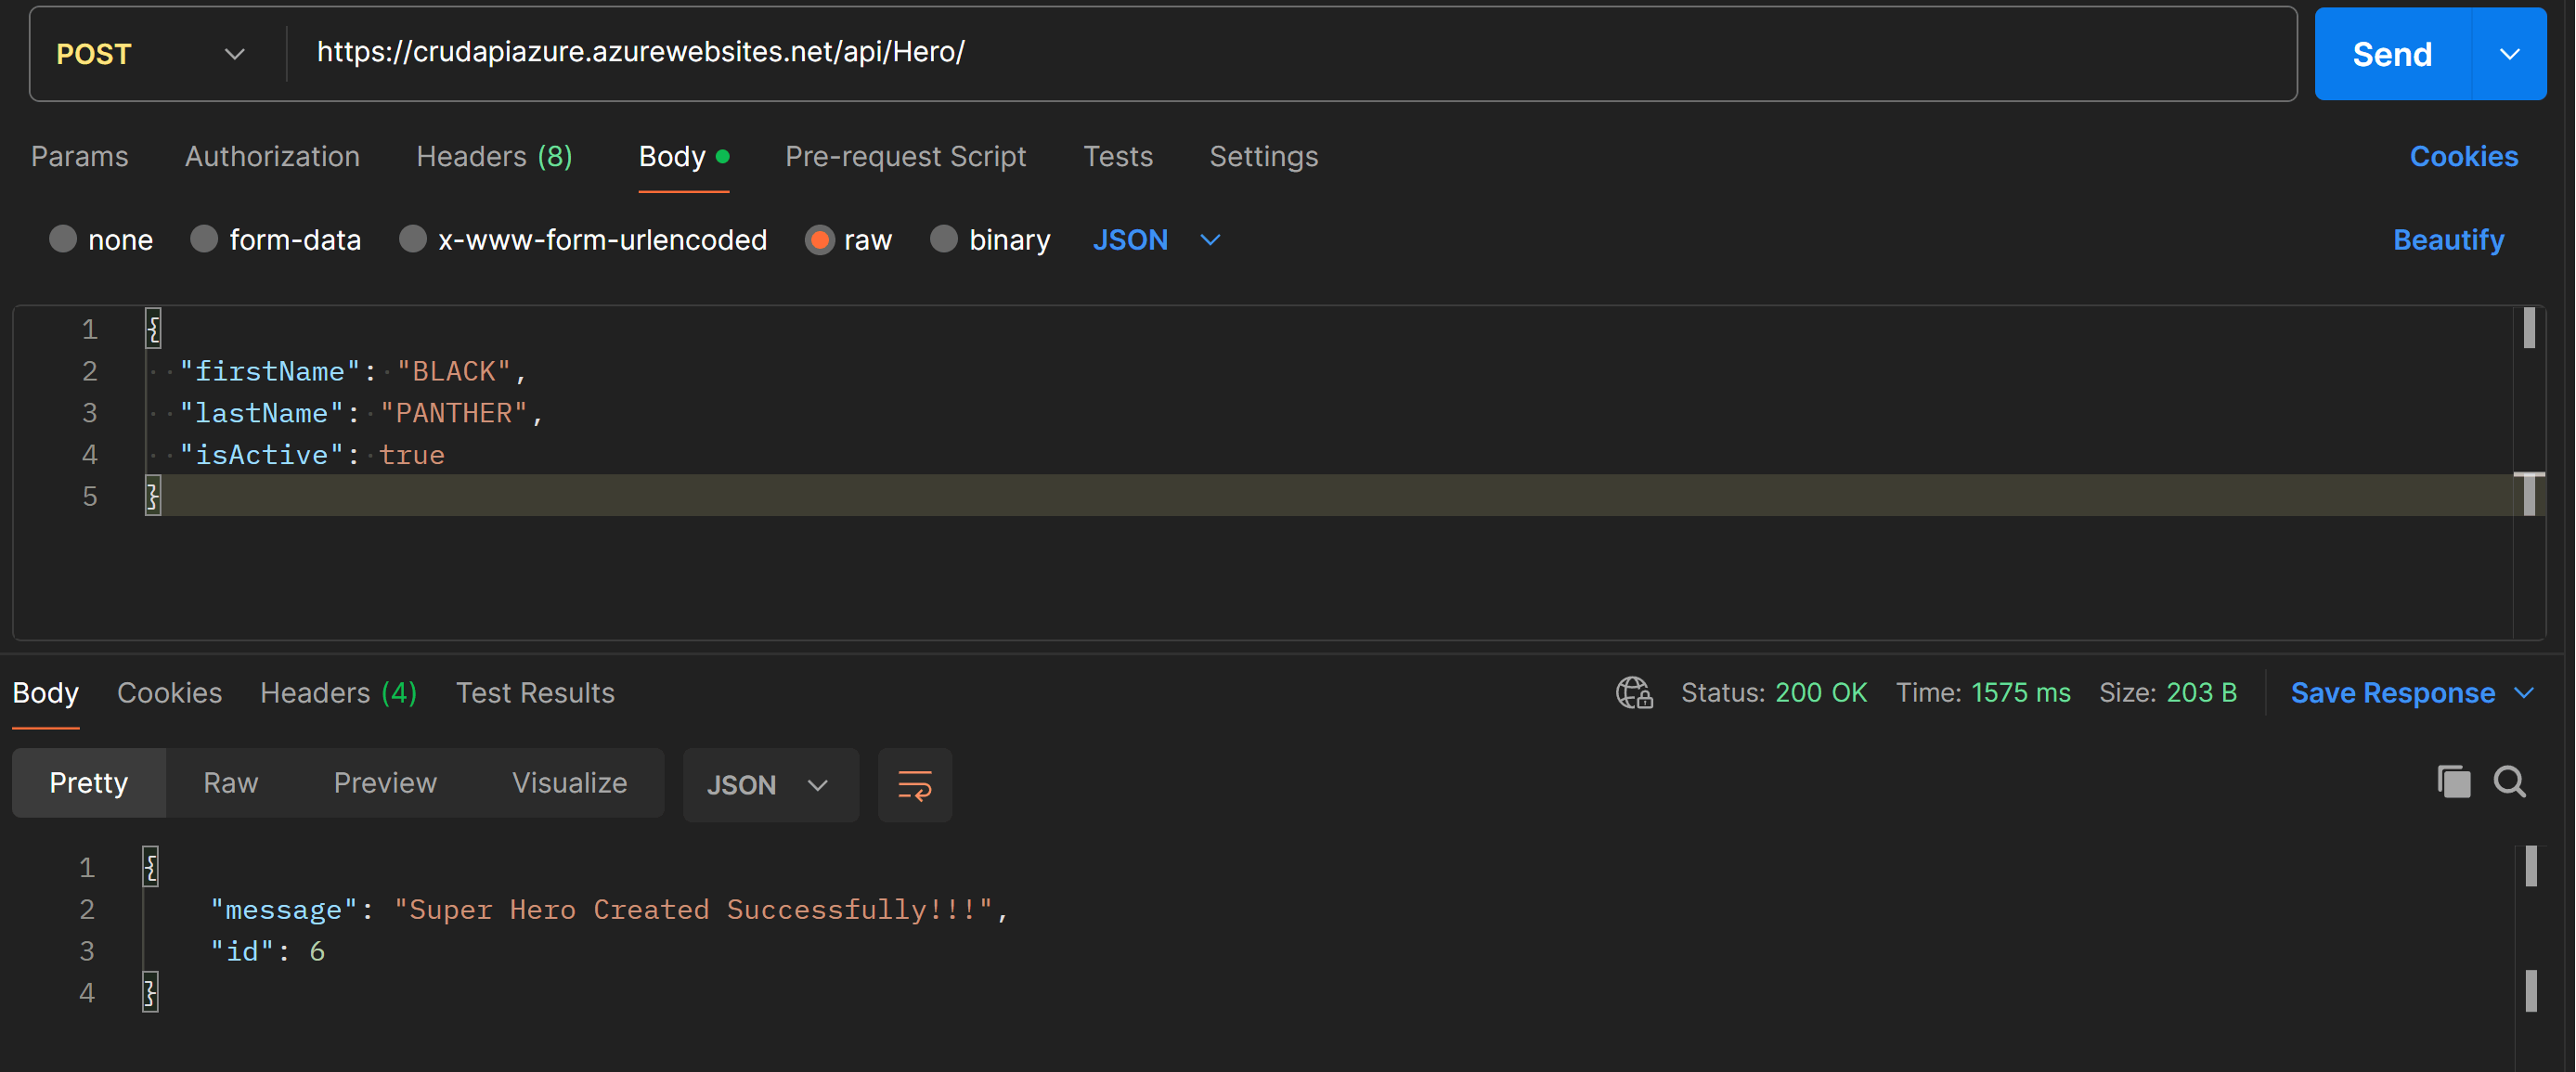
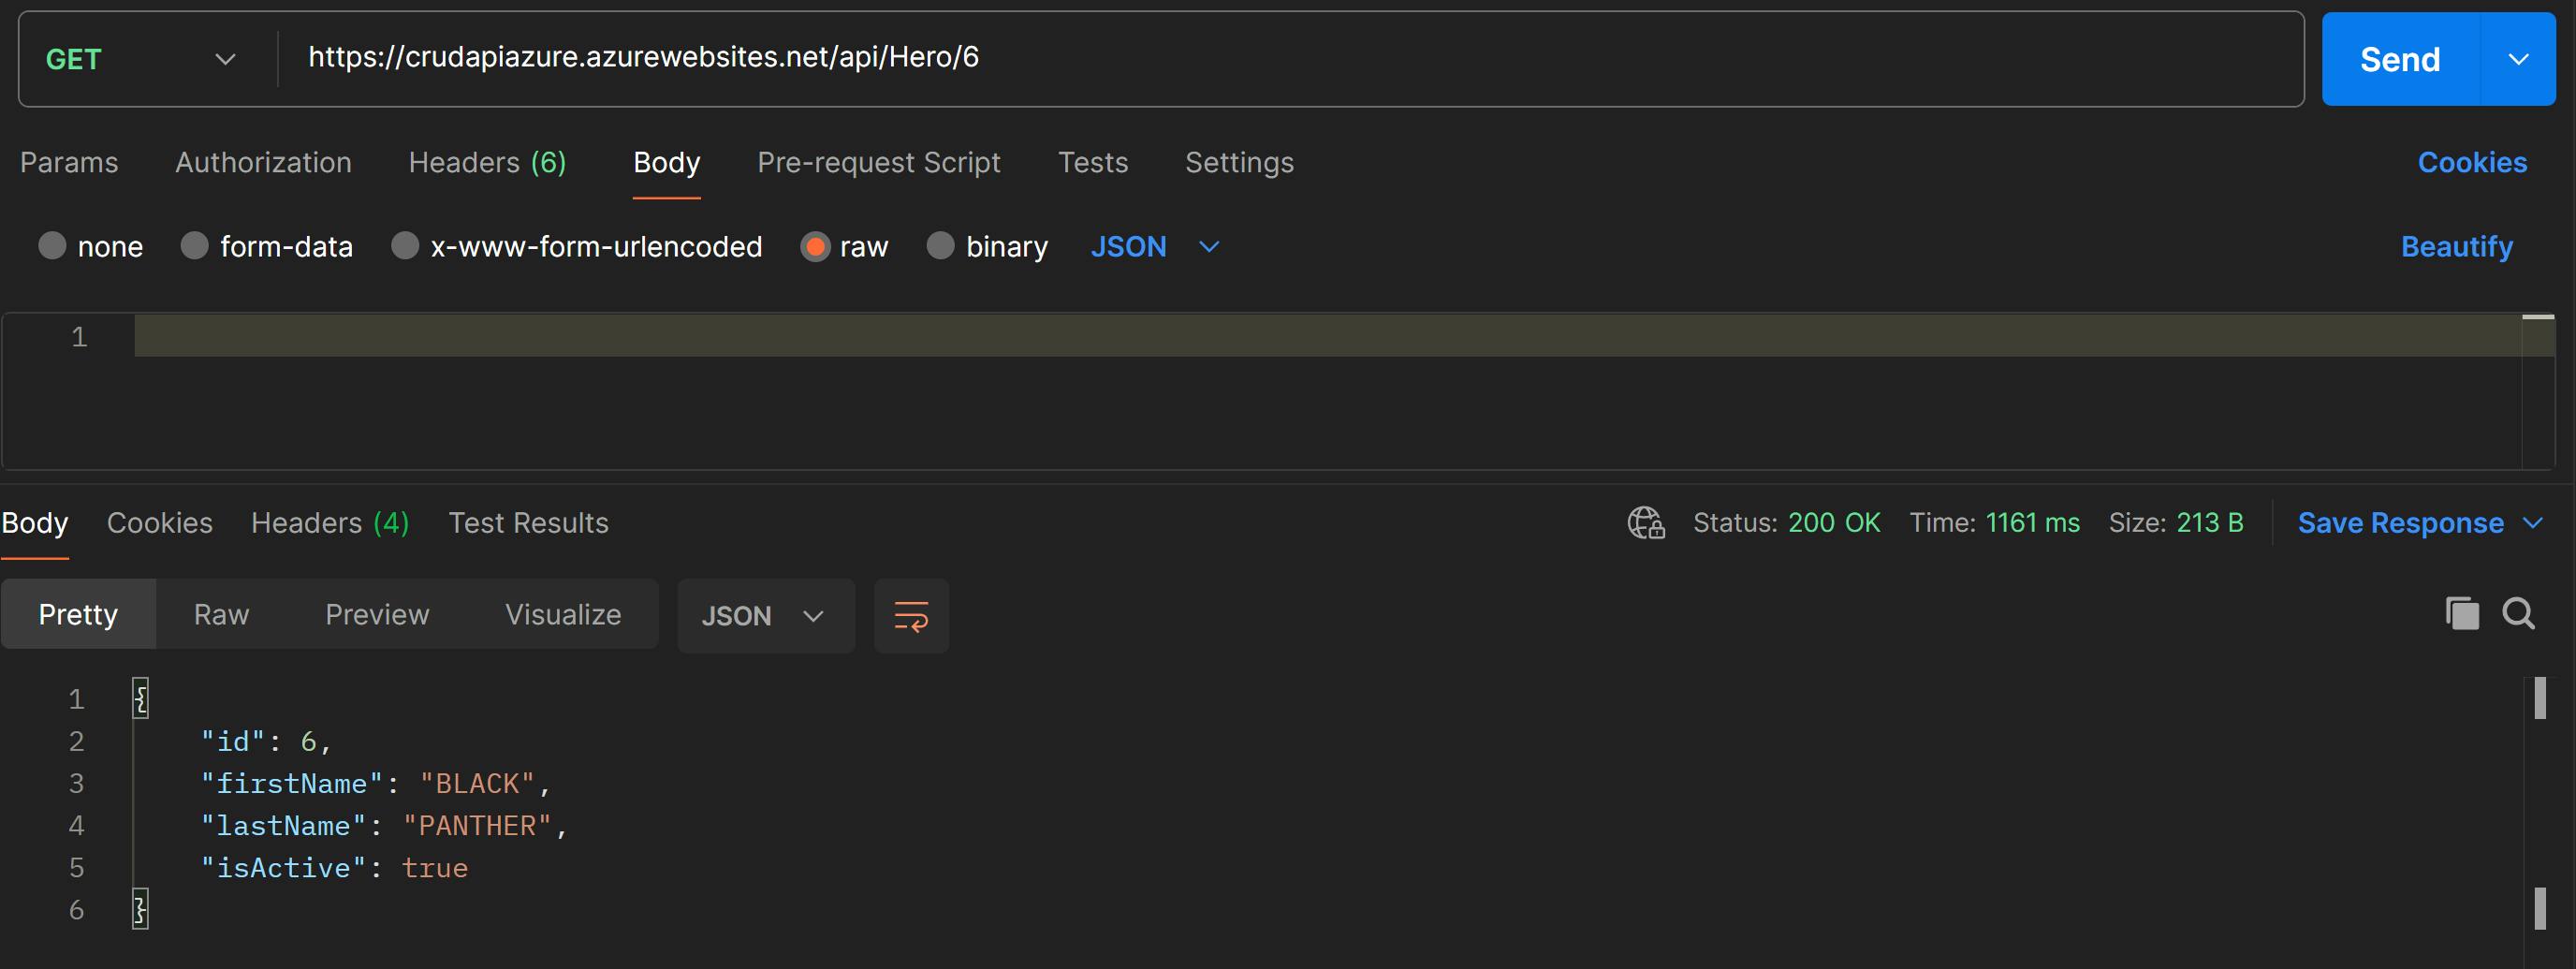
Let's test our Api using Postman
List all Heros in the database
Add a Hero to the database
Get a Hero by ID
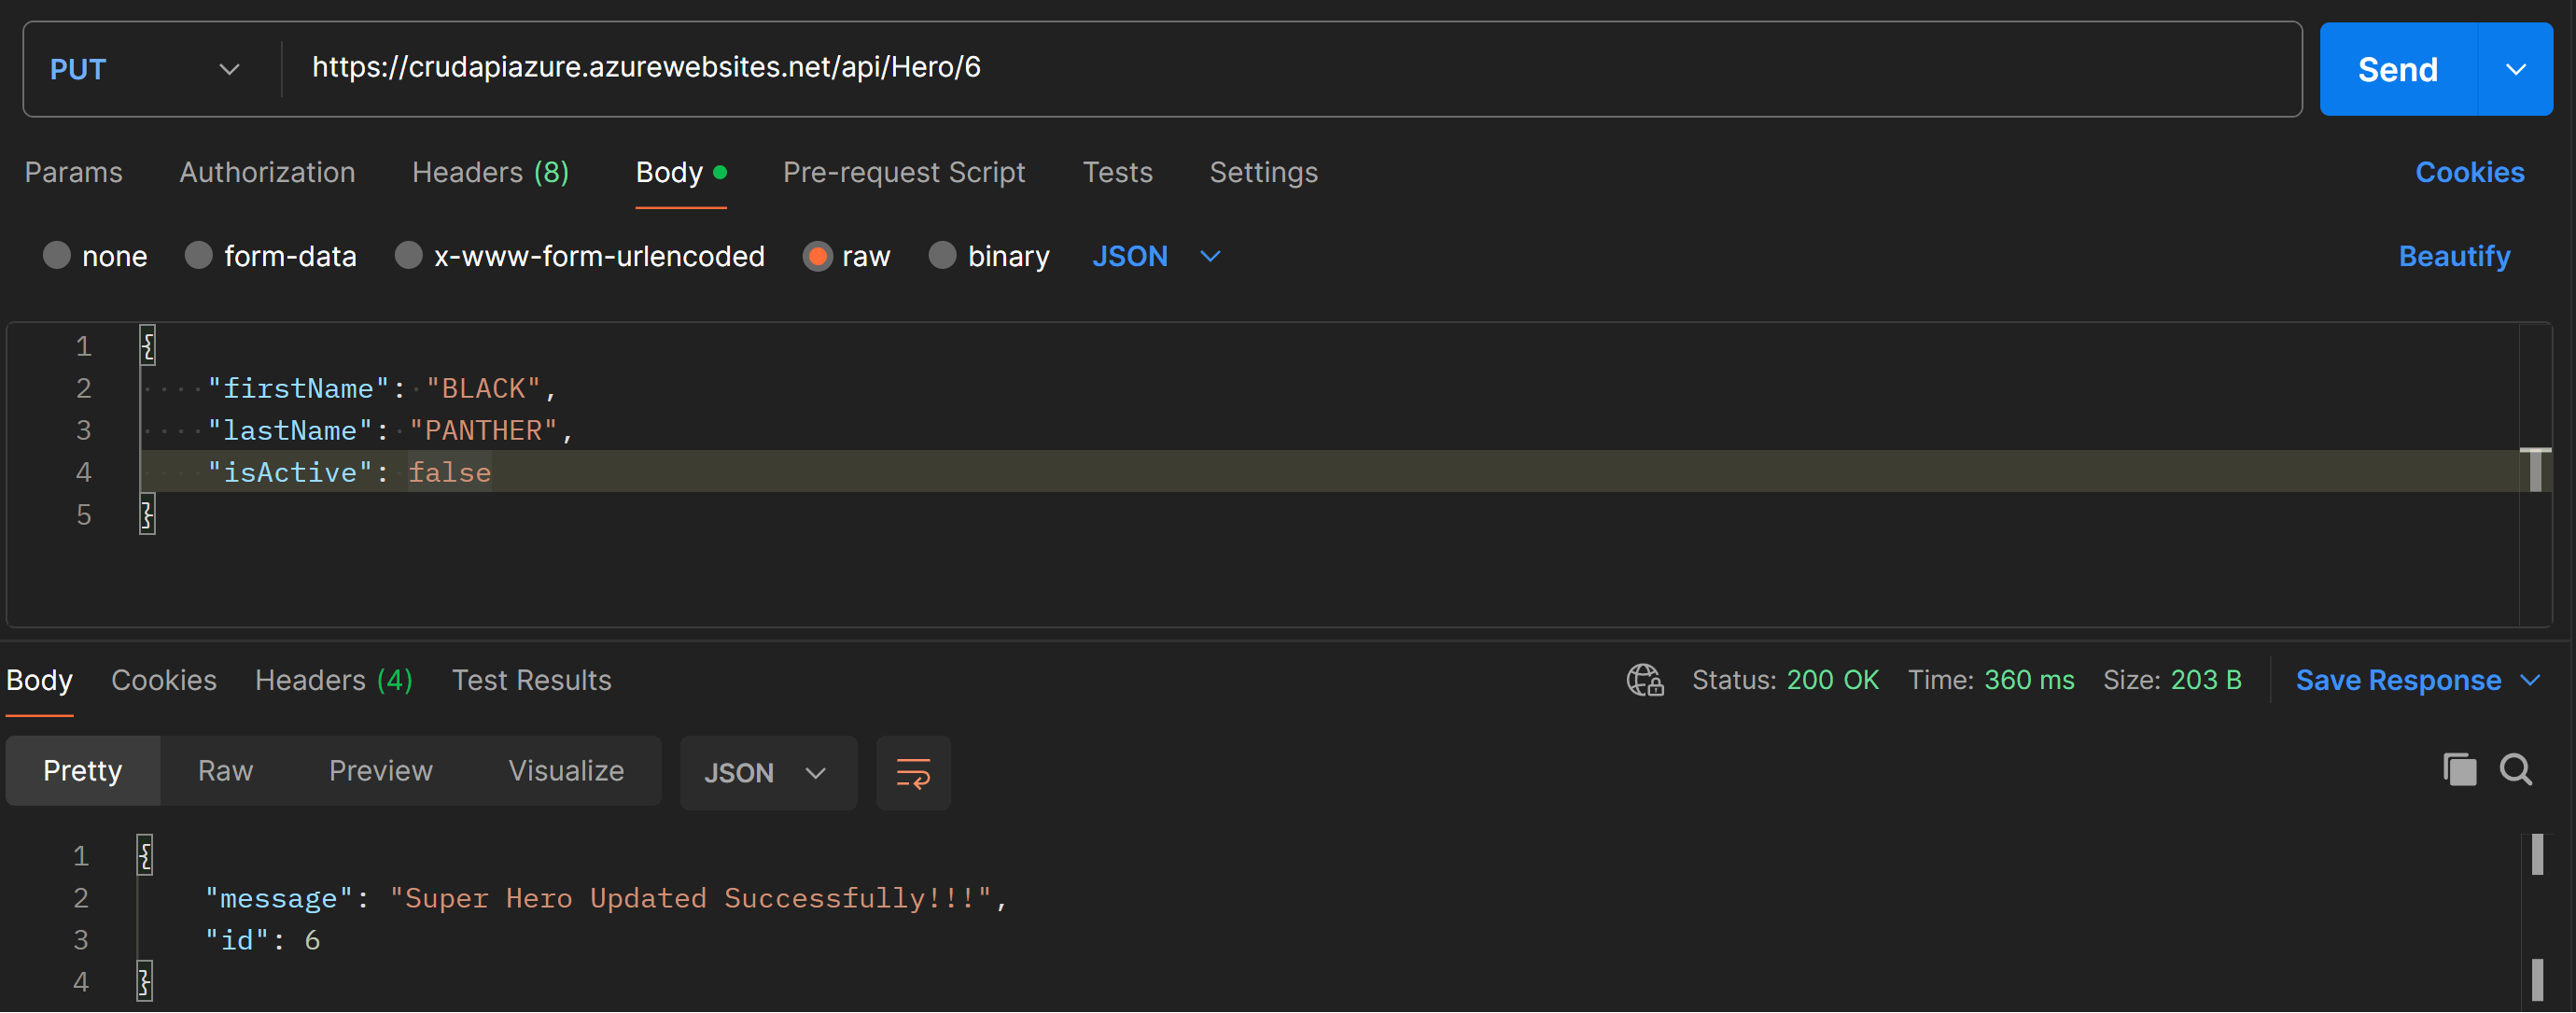
Update a Hero in the database
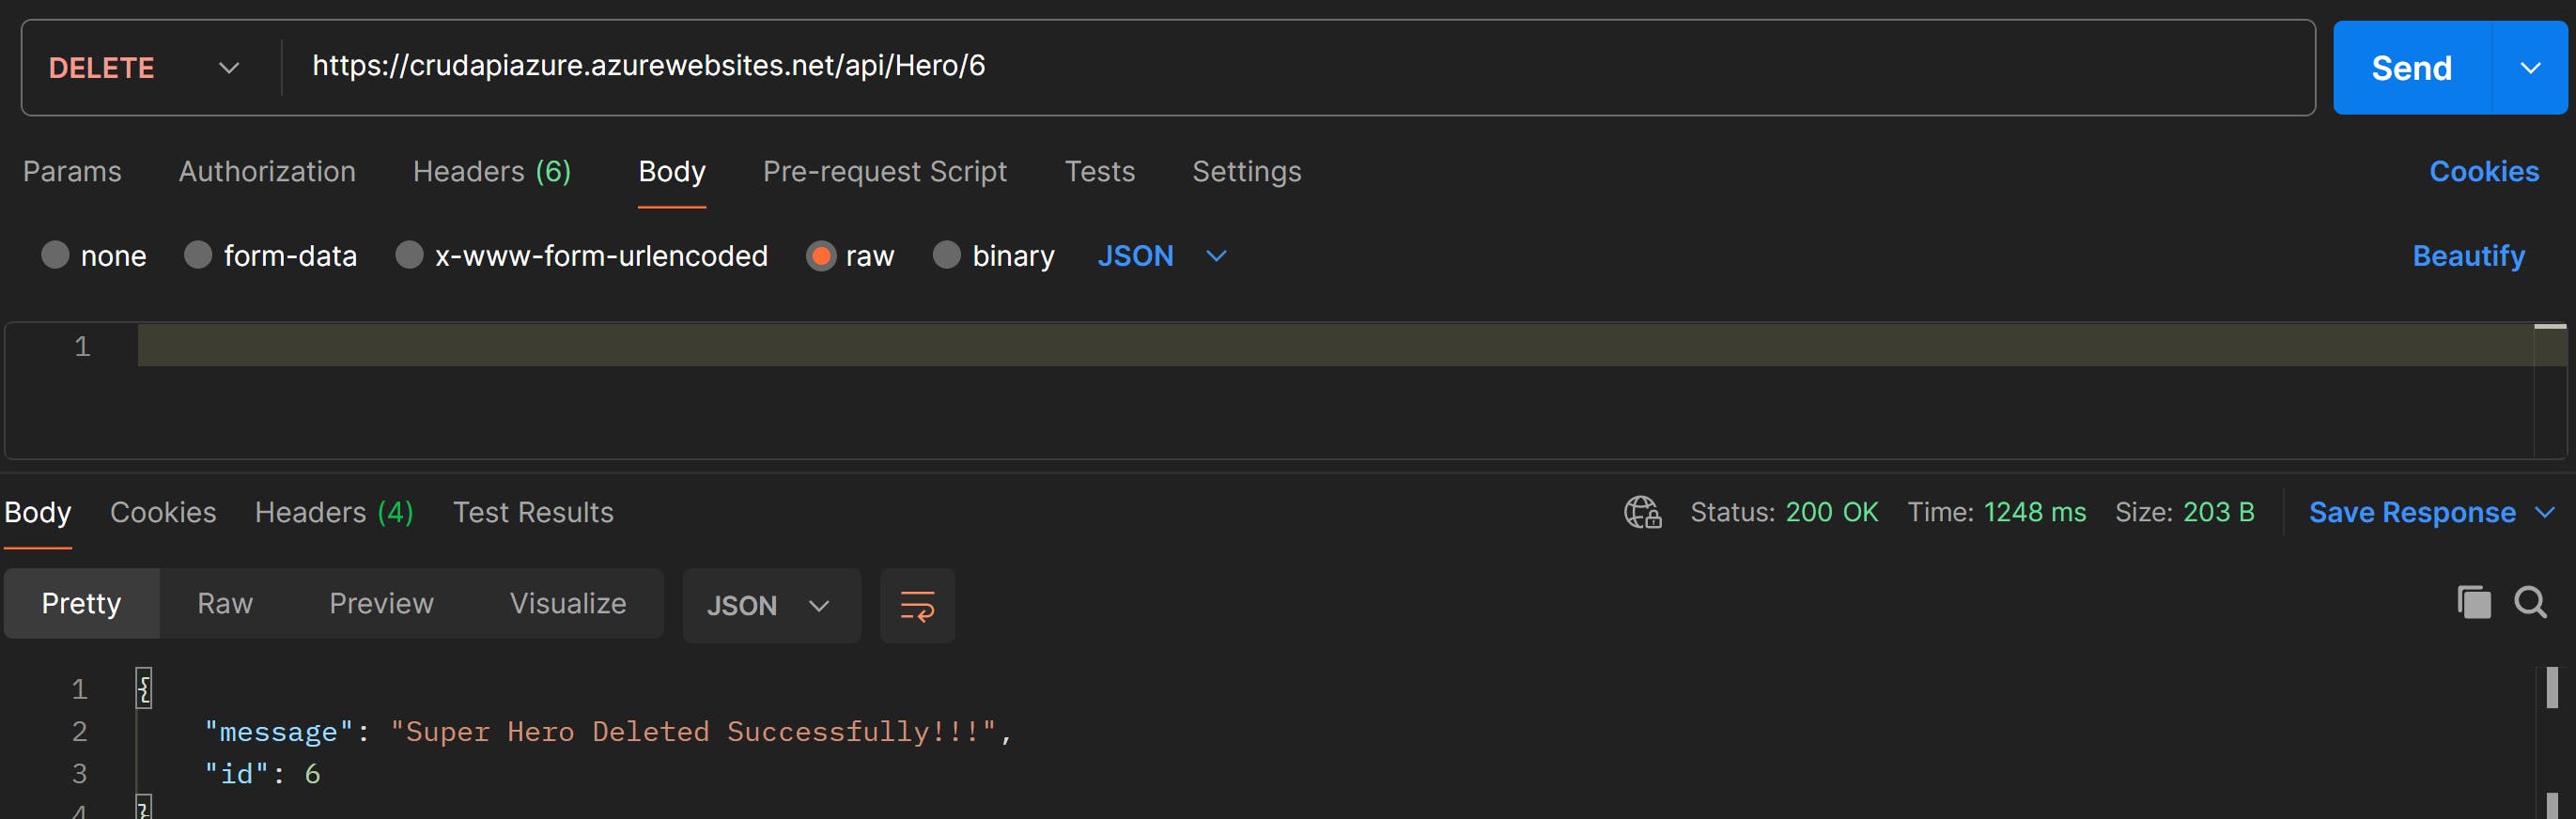
Delete a Hero from the database
That's it we've deployed our api successfully to Azure Web App
Thanks for reading :)